
UnityCelShaderFX
Quick Start
Welcome to CelShaderFX! This guide will help you get up and running in minutes.
Installation
Section titled “Installation”From Unity Package
Section titled “From Unity Package”- Download the CelShaderFX package
- In Unity, go to Assets > Import Package > Custom Package
- Select the downloaded .unitypackage file
- Click Import to import all files
From Asset Store
Section titled “From Asset Store”- Open the Package Manager (Window > Package Manager)
- Select My Assets from the dropdown
- Find CelShaderFX and click Import
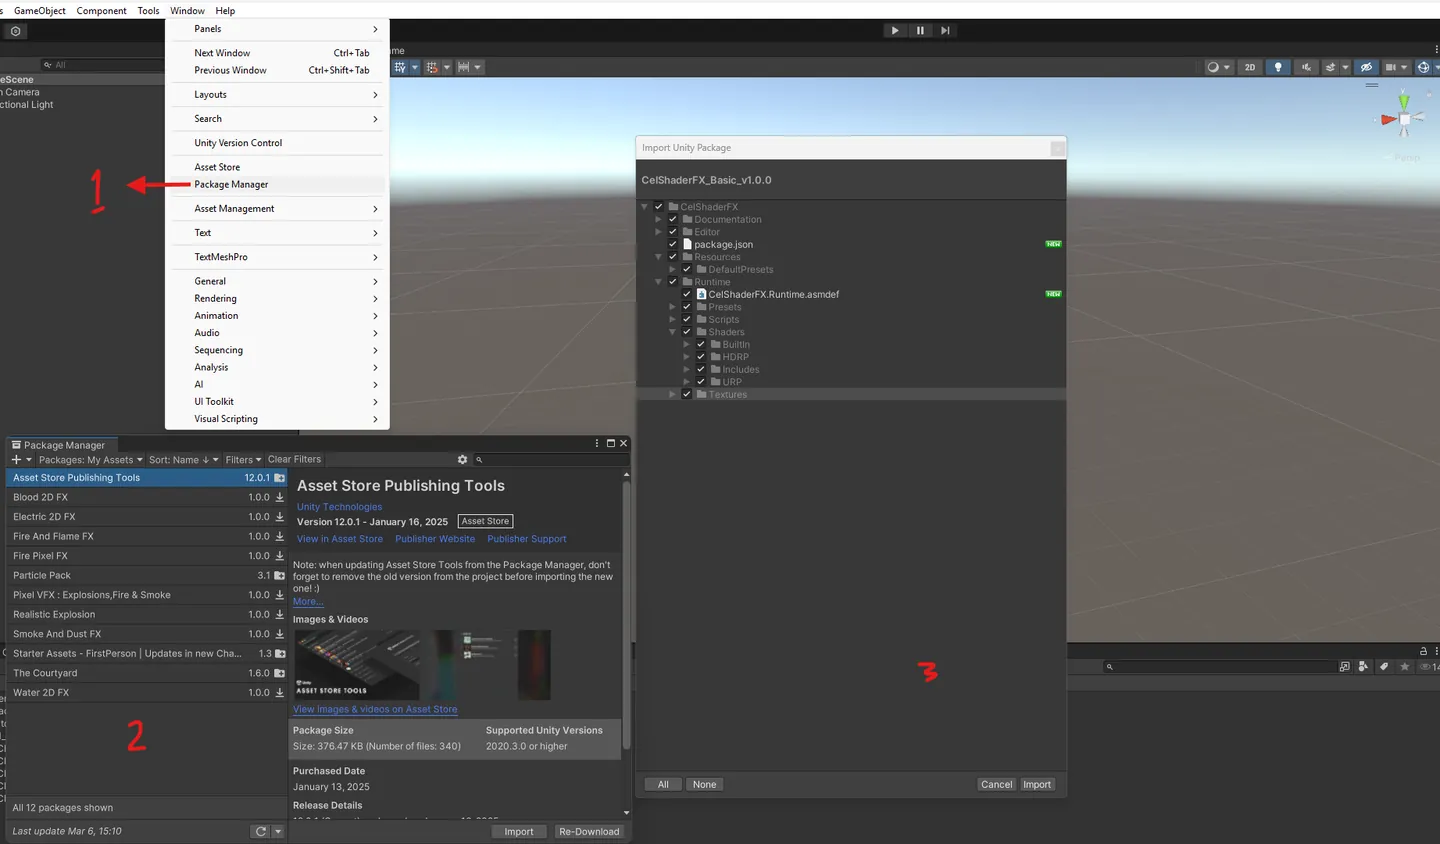
Setup by Render Pipeline
Section titled “Setup by Render Pipeline”CelShaderFX supports all three Unity render pipelines. Follow the instructions for your pipeline.
Built-In Render Pipeline
Section titled “Built-In Render Pipeline”The Built-In pipeline setup is the simplest - just add a component to your camera.
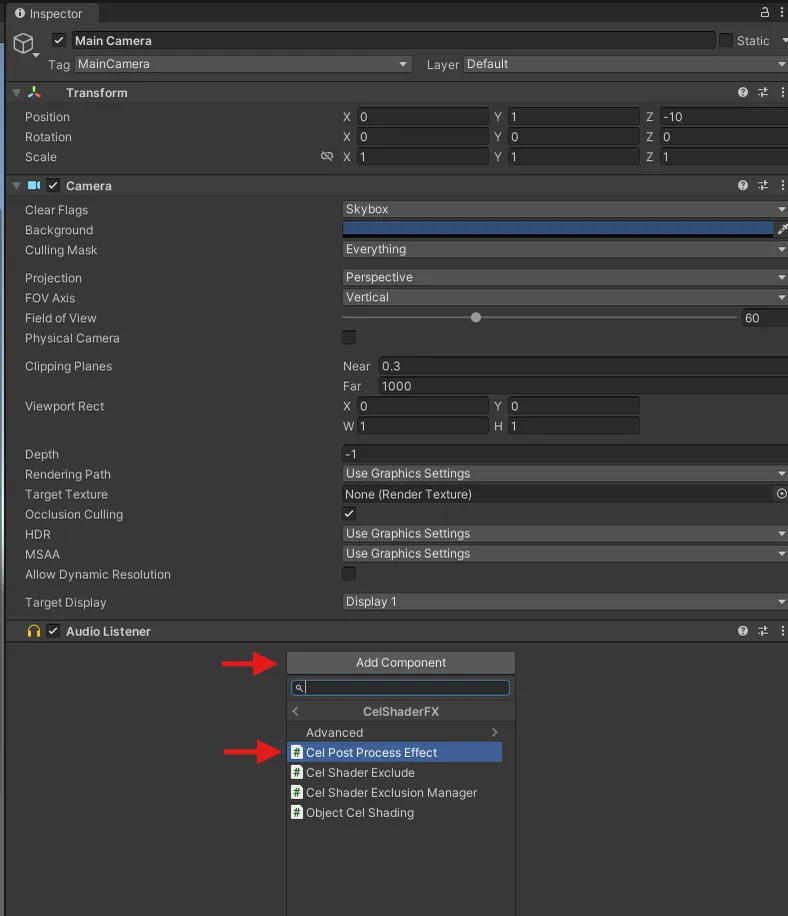
Step 1: Add the Effect Component
- Select your Main Camera in the Hierarchy
- Click Add Component in the Inspector
- Search for “Cel Post Process Effect”
- Add the component
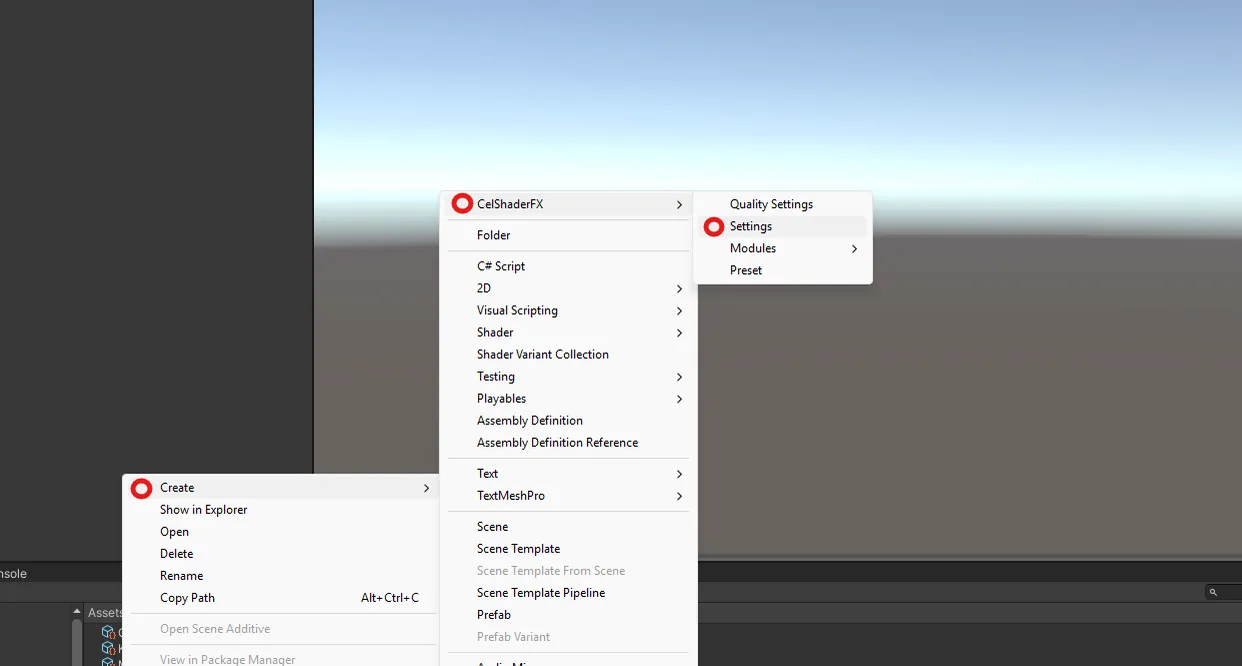
Step 2: Create Settings Asset
- In the Inspector, you’ll see a “Settings” field
- Click Create New to create a new CelShaderSettings asset
- Choose a location to save the asset (e.g., Assets/Settings/)
Step 3: Configure Effects
- Expand the settings in the Inspector
- Enable Cel Shading and Outline to start
- Adjust parameters to taste
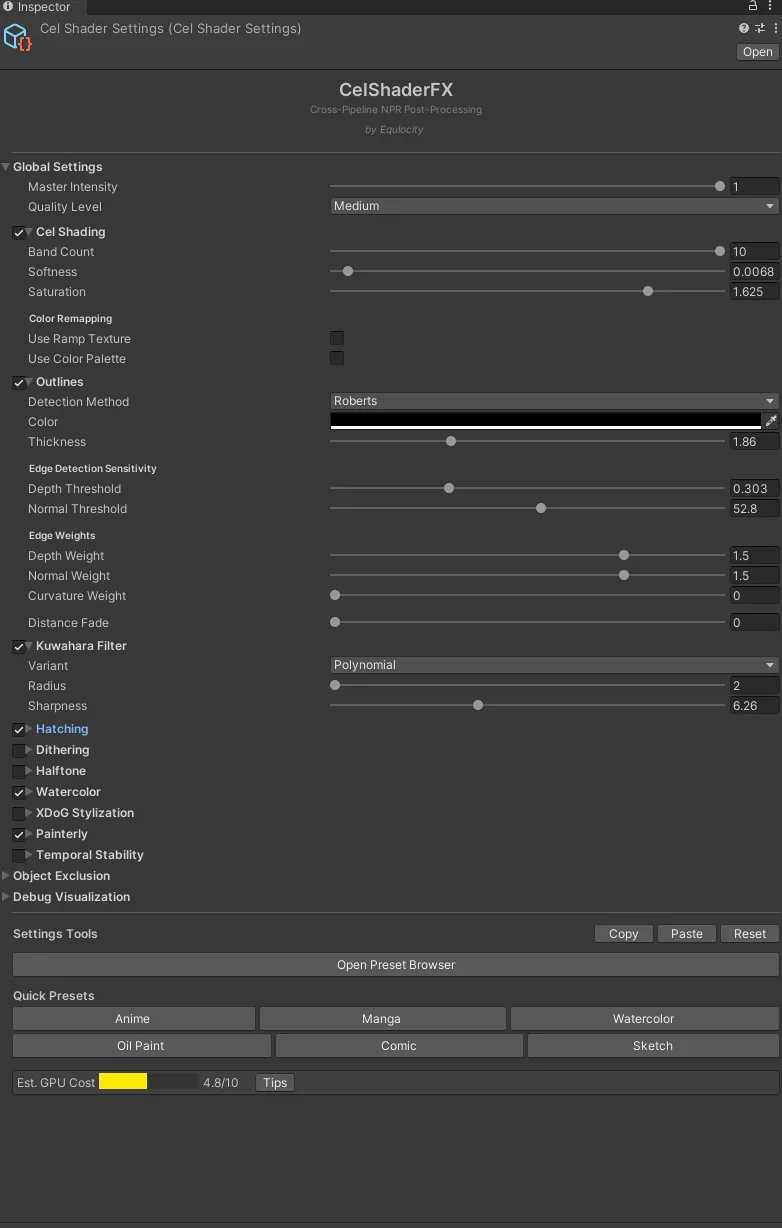
Done! You should now see cel shading applied to your scene.
Universal Render Pipeline (URP)
Section titled “Universal Render Pipeline (URP)”URP uses Renderer Features and Volumes for post-processing.
Step 1: Add Renderer Feature
- Find your URP Renderer Asset (usually in Assets/Settings/)
- Select it and look at the Inspector
- Click Add Renderer Feature
- Select Cel Render Feature
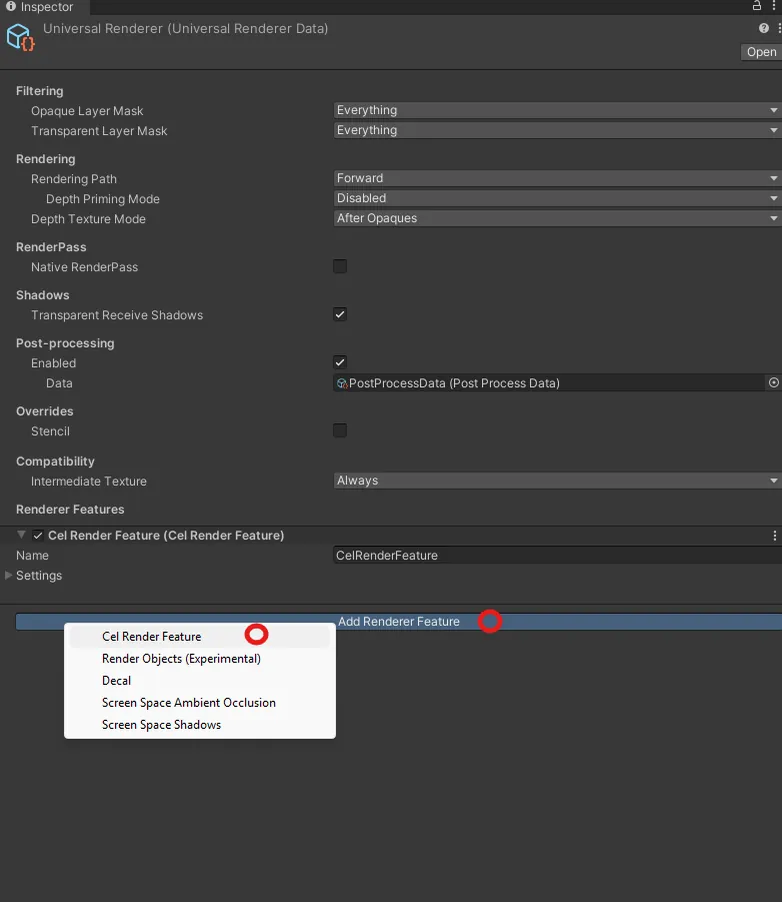
Step 2: Create a Volume
- In your scene, create an empty GameObject
- Name it “Post Processing Volume”
- Add a Volume component
- Set Mode to Global (or Local with a collider)
- Click New to create a new Volume Profile
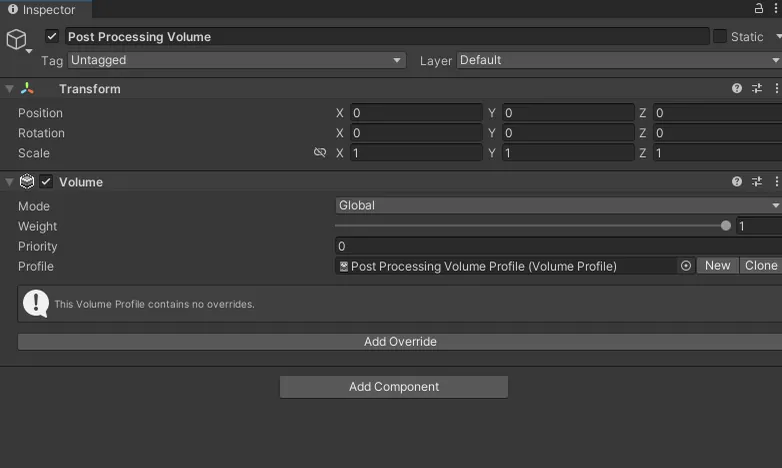
Step 3: Add CelShaderFX Override
- With the Volume selected, click Add Override
- Navigate to Post-processing > CelShaderFX
- Select Cel Volume Component
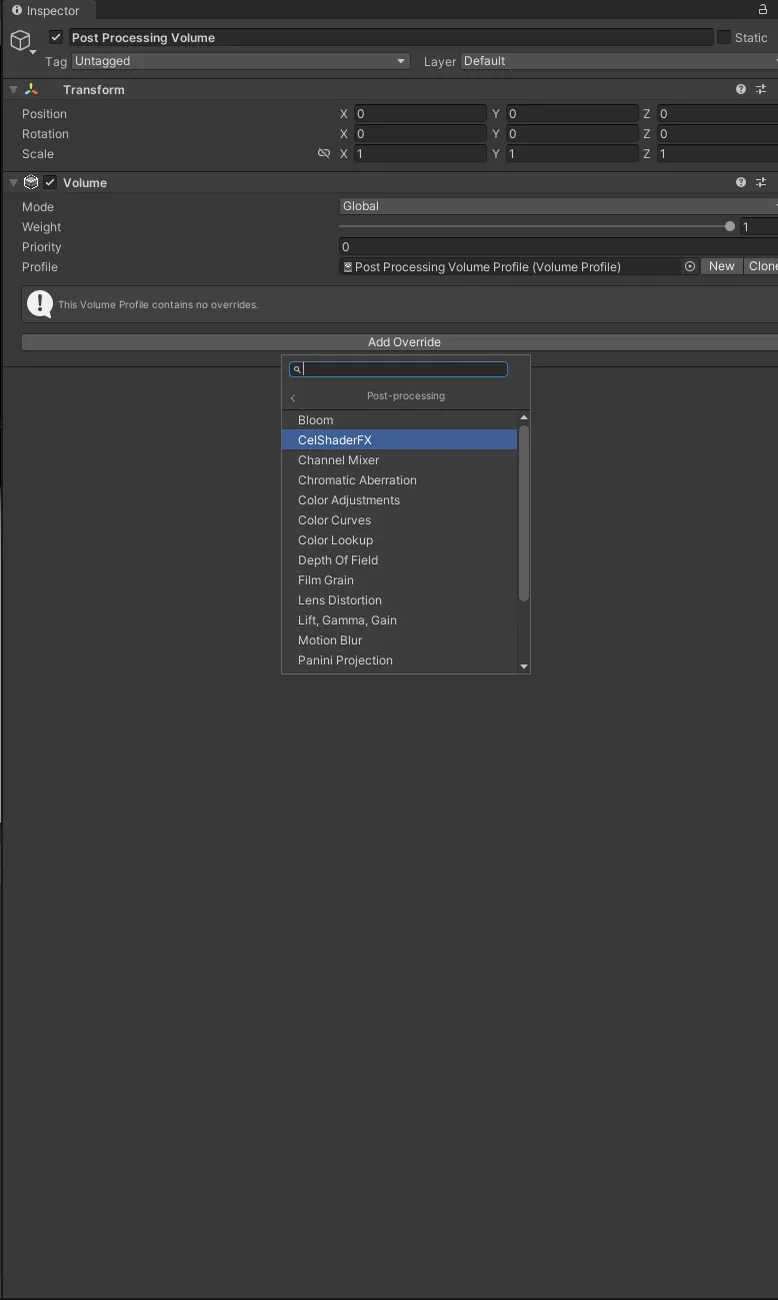
Step 4: Configure Effects
- Enable the effects you want by checking their boxes
- Click All next to each section to enable parameter overrides
- Adjust parameters to taste
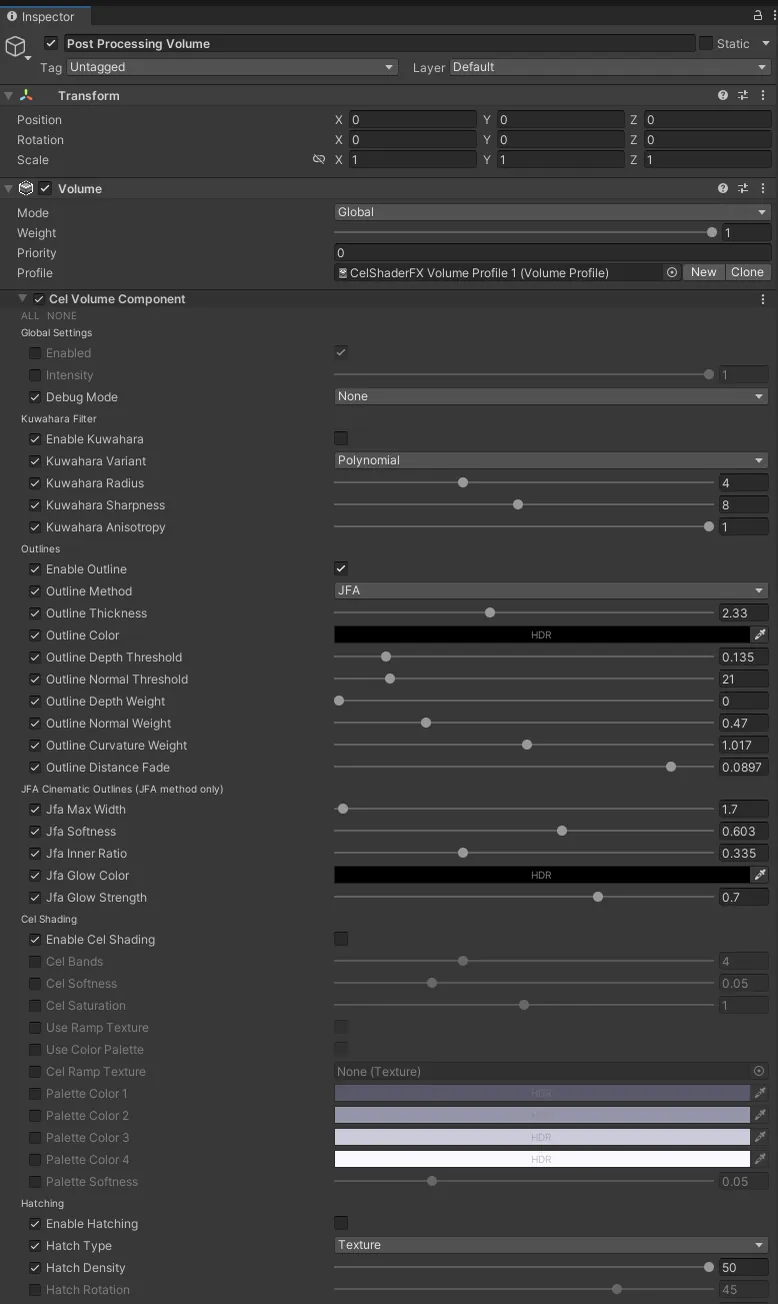
Done! Your URP project now has CelShaderFX.
High Definition Render Pipeline (HDRP)
Section titled “High Definition Render Pipeline (HDRP)”HDRP uses Custom Post Process volumes.
Step 1: Register Custom Post Process
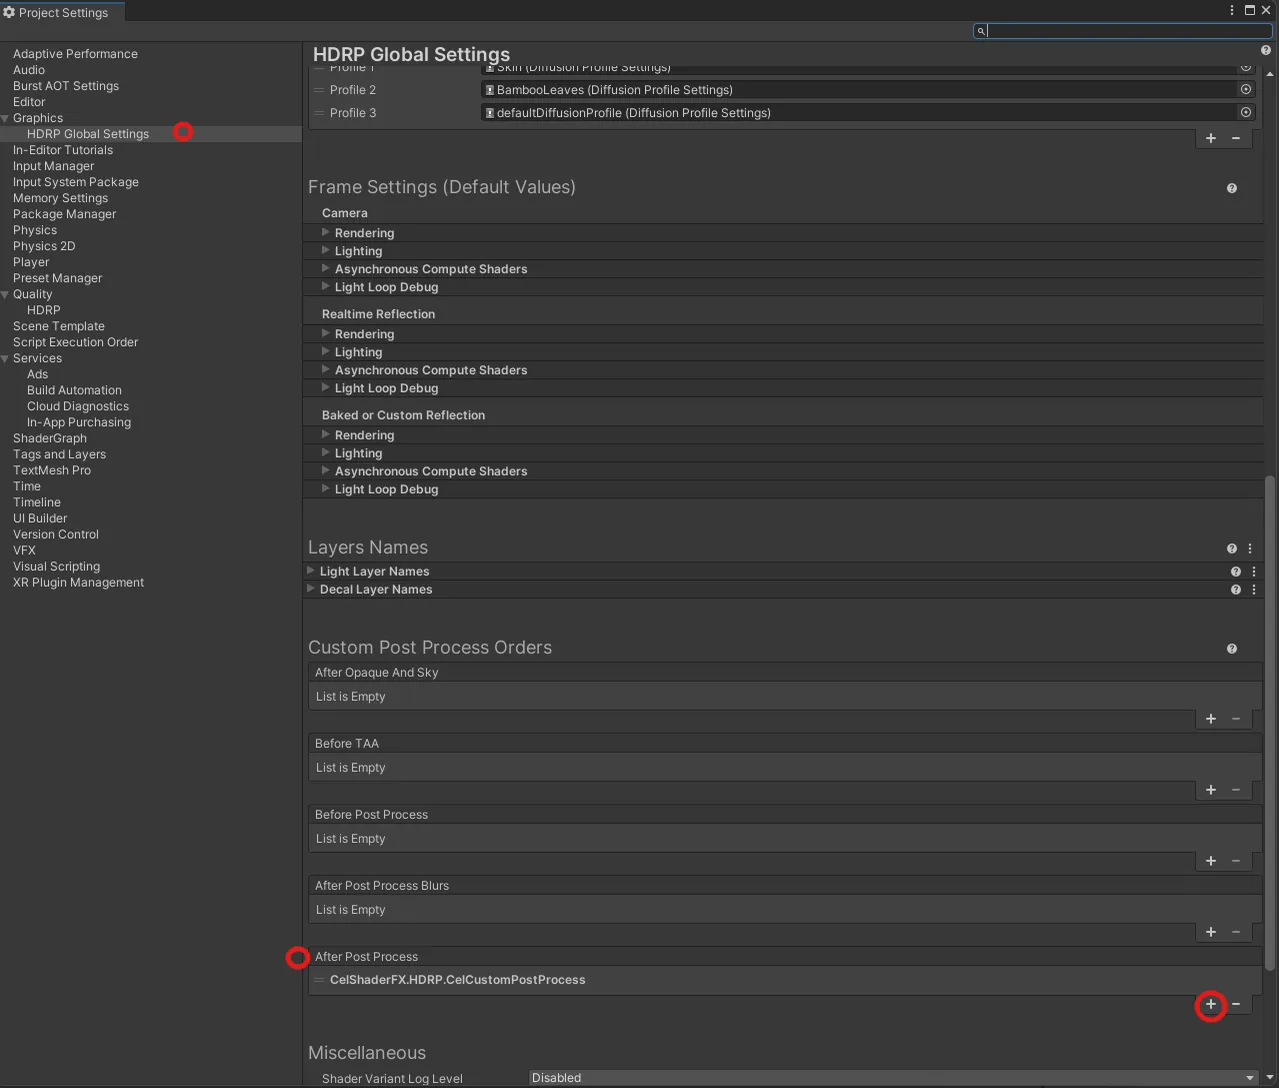
- Go to Edit > Project Settings > HDRP Default Settings
- Scroll down to Custom Post Process Orders
- Under After Post Process, click +
- Add CelCustomPostProcess
Step 2: Create a Volume
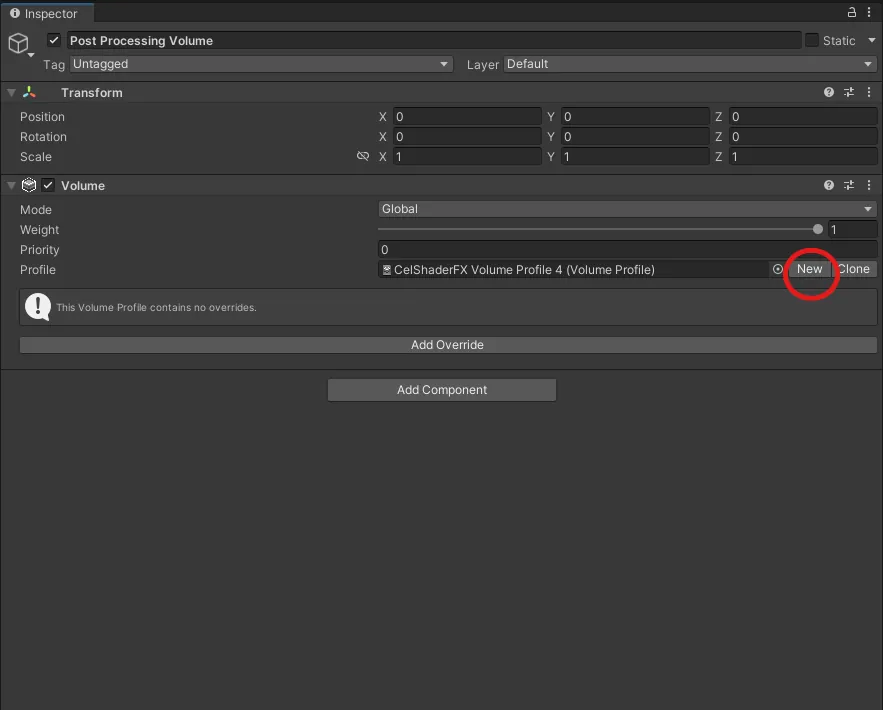
- In your scene, create an empty GameObject
- Name it “Post Processing Volume”
- Add a Volume component
- Set Mode to Global
- Click New to create a new Volume Profile
Step 3: Add CelShaderFX Override
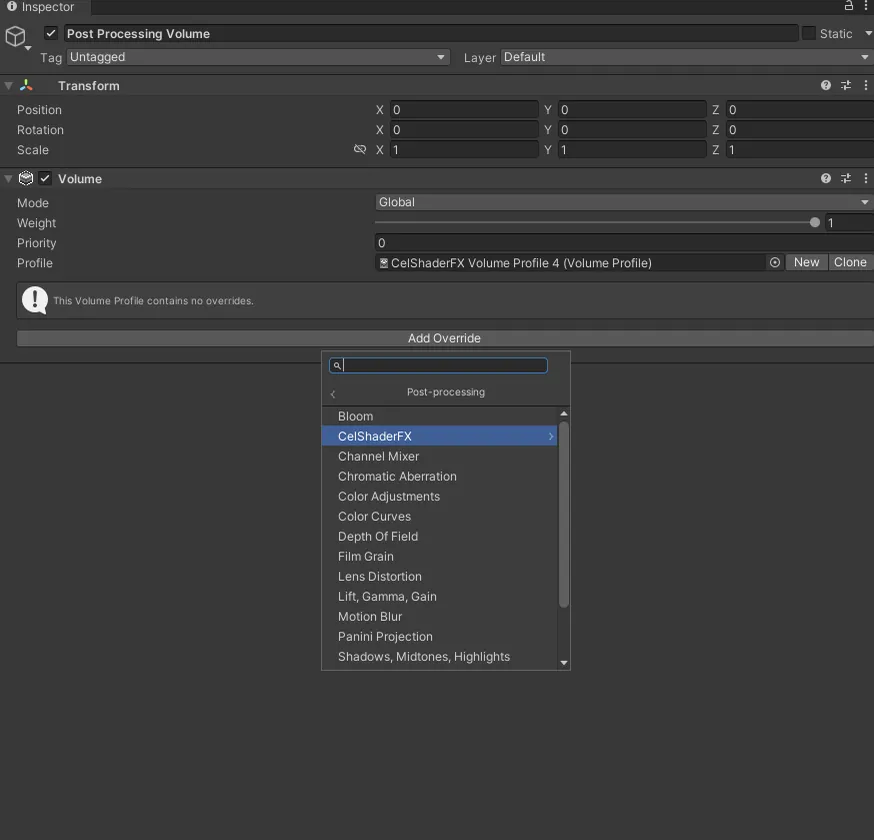
- Click Add Override
- Navigate to Post-processing > CelShaderFX
- Select Cel Custom Post Process
Step 4: Configure Effects
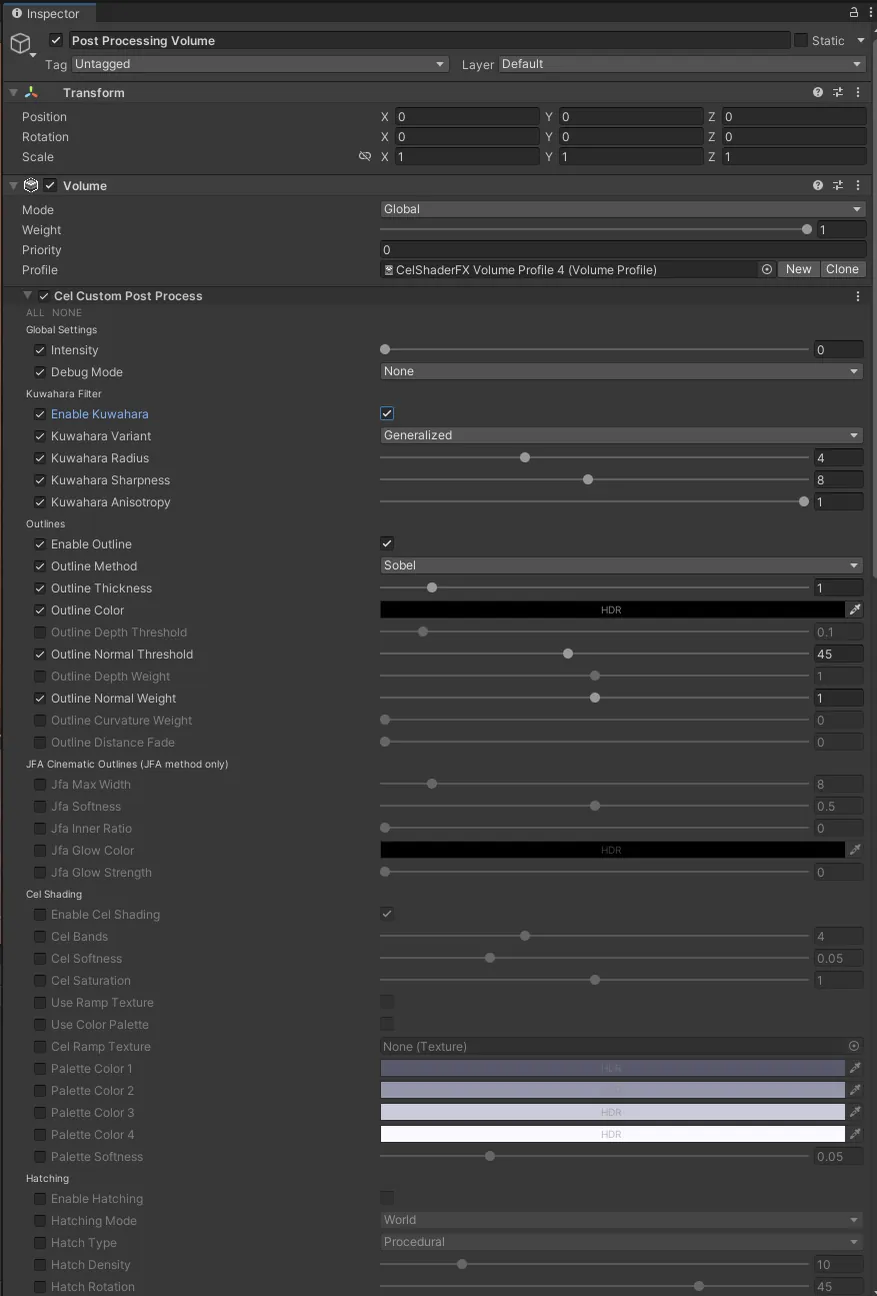
- Enable the effects you want
- Adjust parameters in the Volume override
Done! HDRP is now set up with CelShaderFX.
Your First Effect
Section titled “Your First Effect”Let’s create a classic anime look in 3 simple steps:
Step 1: Enable Cel Shading
Section titled “Step 1: Enable Cel Shading”| Parameter | Value |
|---|---|
| Enable Cel Shading | ✓ |
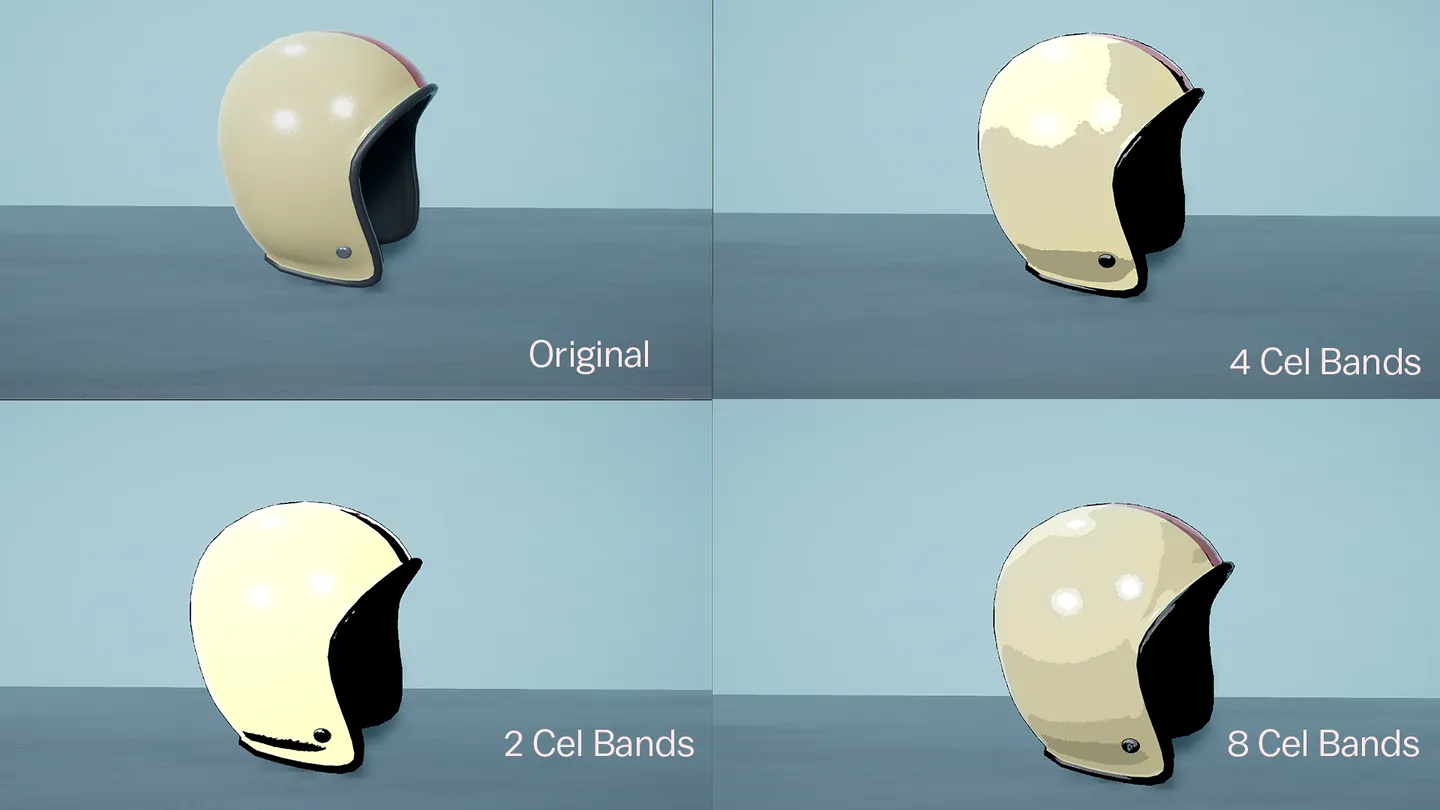
| Band Count | 4 |
| Softness | 0.05 |
| Saturation | 1.0 |
This quantizes colors into discrete bands for the classic toon look.
Step 2: Add Outlines
Section titled “Step 2: Add Outlines”| Parameter | Value |
|---|---|
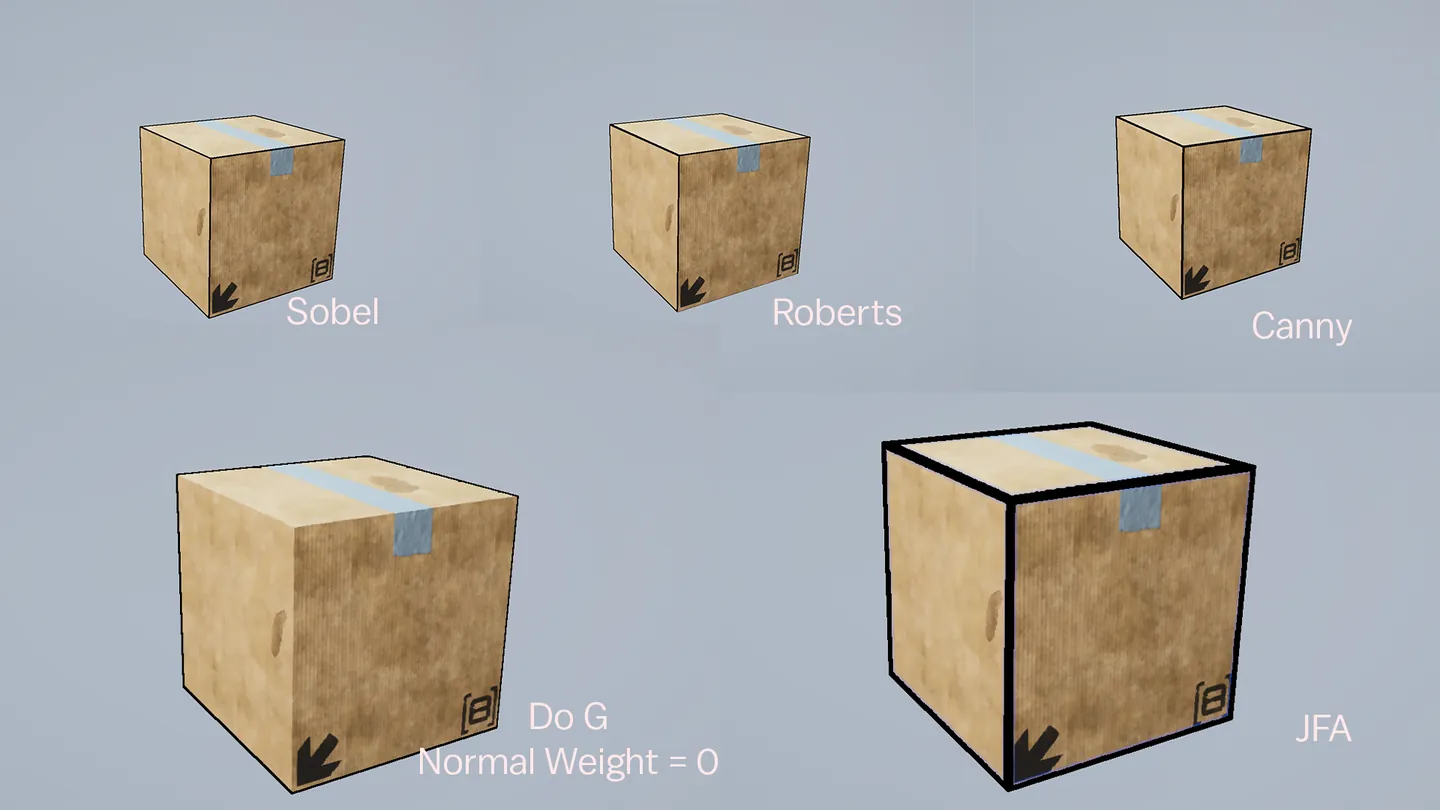
| Enable Outline | ✓ |
| Color | Black |
| Thickness | 1.5 |
| Depth Threshold | 0.1 |
| Normal Threshold | 45 |
Outlines define shapes and add that comic/anime feel.
Step 3: Fine-tune
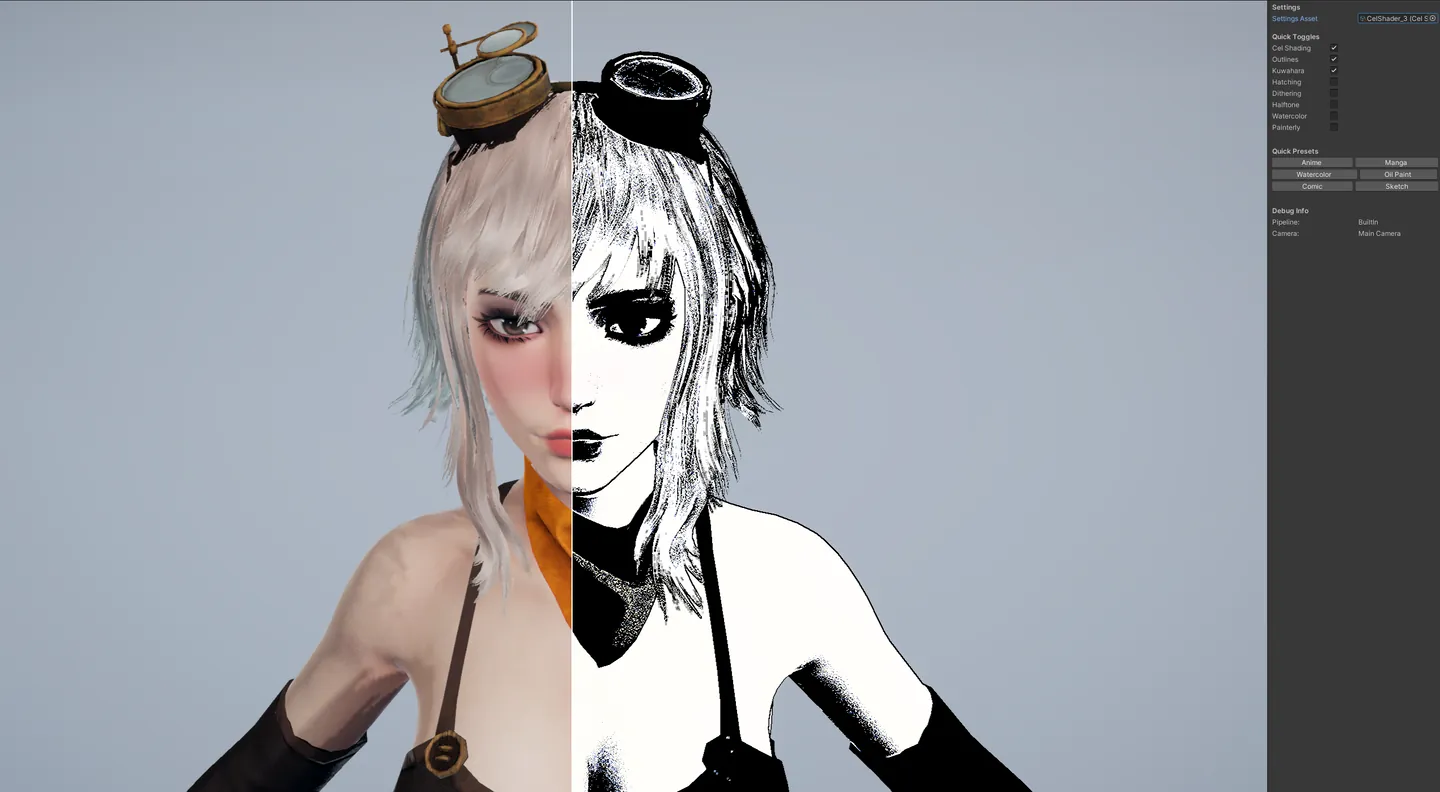
Section titled “Step 3: Fine-tune”Play with these parameters to refine the look:
- Band Count: More bands = more gradual shading
- Outline Thickness: Thicker for bold, thinner for subtle
- Softness: Higher = smoother band transitions
Using Presets
Section titled “Using Presets”CelShaderFX comes with ready-to-use presets for common styles.
Applying a Preset
Section titled “Applying a Preset”Method 1: From Inspector
- Select your CelShaderSettings asset or Volume
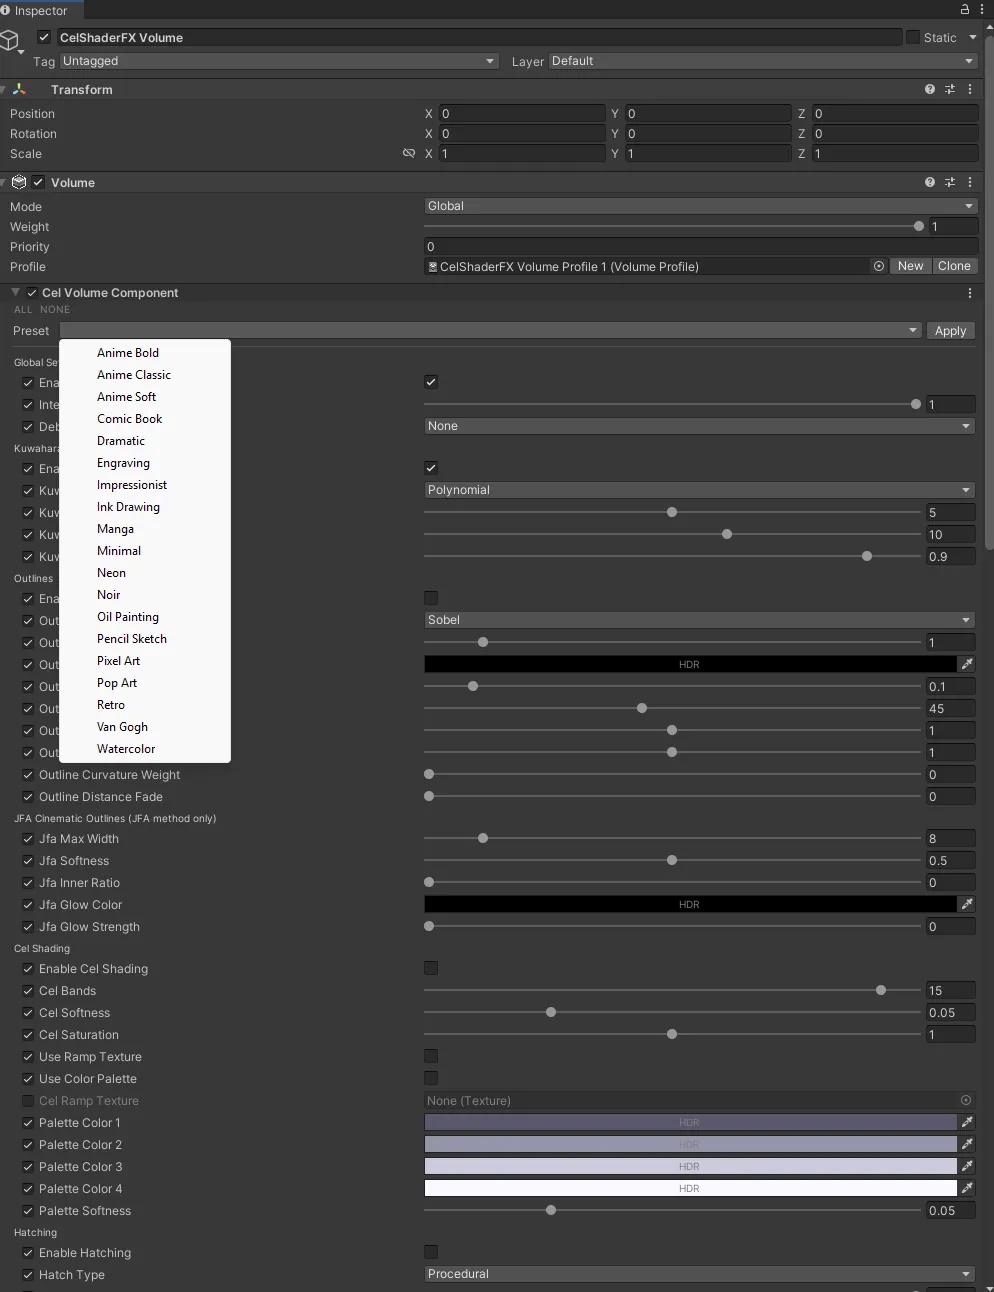
- In the Inspector, find the Presets dropdown
- Select a preset (e.g., “Anime Classic”, “Manga”, “Watercolor”)
- Click Apply
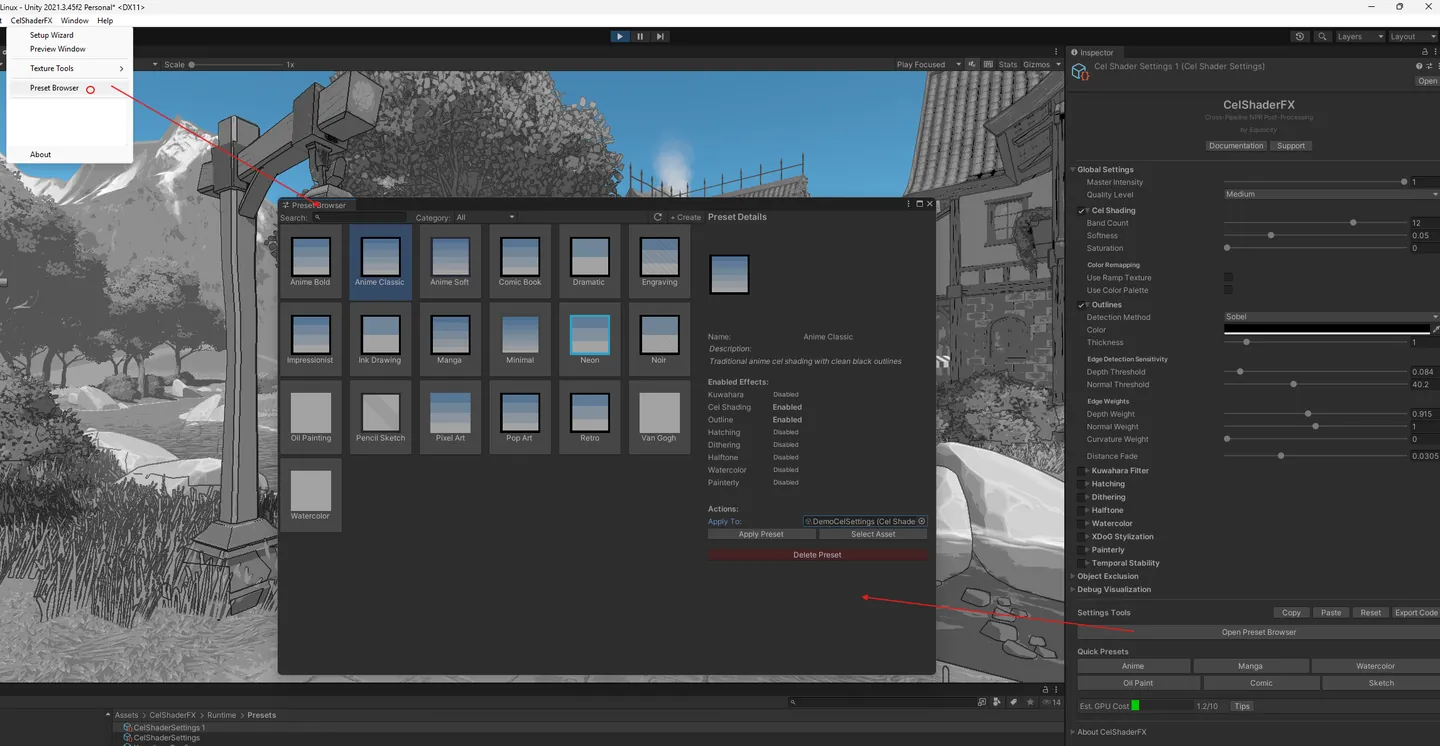
Method 2: From Preset Browser
- Go to Tools > CelShaderFX > Preset Browser
- Browse the visual preset gallery
- Click on a preset to preview
- Click Apply to use it
Available Presets
Section titled “Available Presets”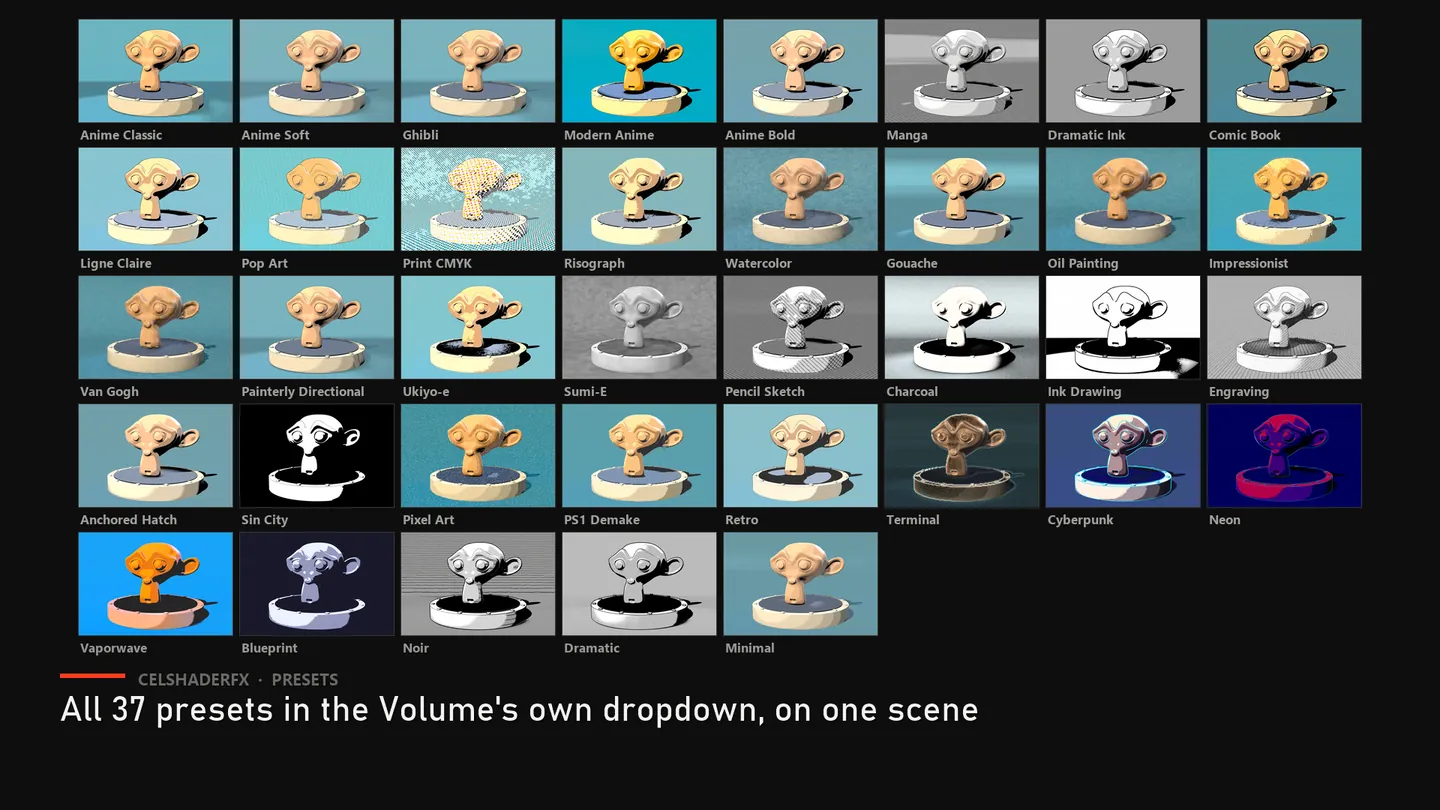
All 37 presets ship in every edition. The Preset Browser can filter them by category.
| Preset | Category | Look |
|---|---|---|
| Anime Classic | Anime | Traditional anime cel shading with clean black outlines |
| Anime Soft | Anime | Soft anime style with smooth shading transitions |
| Anime Bold | Anime | Bold anime style with thick outlines and high contrast |
| Modern Anime | Anime | Crisp modern anime: sharp cel bands, a clean JFA rim and the Anime grade |
| Ghibli | Anime | Soft painterly anime: a warm Ghibli colour grade with gentle edge-preserving smoothing |
| Manga | Manga | Black and white manga with screentone patterns |
| Dramatic Ink | Manga | High-contrast manga ink with edge-tangent flow strokes |
| Comic Book | Comic | Bold comic book style with halftone dots |
| Ligne Claire | Comic | European comic: clean uniform outlines, flat bold colour, no hatching |
| Pop Art | Comic | Warhol-inspired pop art with halftone dots |
| Print CMYK | Comic | CMYK print reproduction with SWOP plate angles and paper grain |
| Risograph | Comic | Riso print: coarse halftone, limited warm palette and heavy paper grain |
| Watercolor | Painting | Soft watercolor painting effect with paper texture |
| Oil Painting | Painting | Rich oil painting with visible brush strokes |
| Impressionist | Painting | Monet-inspired impressionist painting |
| Van Gogh | Painting | Expressive brushwork inspired by Van Gogh |
| Gouache | Painting | Matte flat-painterly: vector-art Kuwahara with a soft thin outline |
| Painterly Directional | Painting | Smooth Polynomial Kuwahara fills with curvature-following hatching that wraps the surface |
| Ukiyo-e | Painting | Japanese woodblock print: flat colour fields, bold ink lines and paper texture |
| Sumi-E | Painting | Eastern ink wash: smooth Polynomial Kuwahara tones with sharp edge-tangent ink strokes on light paper grain |
| Pencil Sketch | Drawing | Pencil sketch with cross-hatching |
| Charcoal | Drawing | Soft charcoal drawing: smudged near-mono tones, canvas tooth and heavy paper grain |
| Ink Drawing | Drawing | Clean ink drawing with bold lines |
| Engraving | Drawing | Detailed engraving with fine line patterns |
| Anchored Hatch | Drawing | Pattern hatching anchored to world geometry, so it does not swim when the camera moves |
| Sin City | Drawing | Stark graphic-novel ink: extreme black-and-white XDoG, no shading |
| Pixel Art | Retro | Clean, vibrant pixel art: blocky pixelation, hard banding and light dither |
| PS1 Demake | Retro | Lo-fi retro: chunky pixelation, ordered dithering and hard colour banding |
| Retro | Retro | Retro game style with limited colours and dithering |
| Neon | Experimental | Vibrant neon glow with strong outlines |
| Cyberpunk | Experimental | Neon-noir: a cyberpunk colour grade with a glowing rim light |
| Vaporwave | Experimental | 80s retro aesthetic: pink/cyan split-tone, banding and ordered dither |
| Blueprint | Experimental | Technical schematic: cool blue monochrome with XDoG line work |
| Terminal | Experimental | Green-phosphor terminal: ASCII character rendering with a CRT-green tint |
| Noir | Experimental | High contrast noir style |
| Dramatic | Custom | High contrast dramatic lighting style |
| Minimal | Custom | Subtle cel shading with thin outlines |
Next Steps
Section titled “Next Steps”Now that you have the basics, explore more:
Learn More Effects
Section titled “Learn More Effects”- User Manual - Complete guide to all effects and parameters
- Effects Reference - Detailed documentation for each effect
Advanced Features
Section titled “Advanced Features”- Modular Controller - Runtime effect control
- Custom Presets - Save your own presets
- Object Exclusion - Exclude objects from effects
Get Help
Section titled “Get Help”- Troubleshooting - Common issues and solutions
- API Reference - Scripting documentation
Quick Reference Card
Section titled “Quick Reference Card”Keyboard Shortcuts (Preview Window)
Section titled “Keyboard Shortcuts (Preview Window)”| Shortcut | Action |
|---|---|
| Space | Toggle effect on/off |
| 1-9 | Quick switch presets |
| S | Toggle split view |
| R | Reset to defaults |
Common Settings Quick Reference
Section titled “Common Settings Quick Reference”| Style | Cel Bands | Outline | Extra |
|---|---|---|---|
| Anime | 3-4 | 1-2px black | - |
| Manga | 2-3 | 2px black | Hatching |
| Comic | 4-5 | 2-3px black | Halftone |
| Watercolor | - | Soft edges | Granulation |
| Oil Paint | - | - | Kuwahara + Painterly |
*Continue to the User Manual* for complete documentation.
Opens our feedback form in a new tab with the tool name pre-filled.