
UnityCelShaderFX
Troubleshooting
Common Issues and Solutions
Section titled “Common Issues and Solutions”Table of Contents
Section titled “Table of Contents”- Installation Issues
- Effect Not Visible
- Visual Artifacts
- Performance Issues
- Pipeline-Specific Issues
- Shader Errors
- Editor Issues
- FAQ
Installation Issues
Section titled “Installation Issues”Package won’t import
Section titled “Package won’t import”Symptoms:
- Import fails with errors
- Missing scripts after import
Solutions:
- Check Unity version - CelShaderFX requires Unity 2021.3 or later
- Close and reopen Unity - Sometimes Unity needs a restart
- Delete Library folder - Force reimport:
-
- Close Unity
- Delete Library folder in project root
- Reopen Unity
Missing assembly references
Section titled “Missing assembly references”Symptoms:
- The type or namespace ‘CelShaderFX’ could not be found
Solutions:
- Check Assembly Definitions - Ensure your scripts reference the CelShaderFX assembly
- Reimport package - Right-click CelShaderFX folder > Reimport
Compile errors after updating from v2.0.x to v2.1
Section titled “Compile errors after updating from v2.0.x to v2.1”Symptoms:
- After importing the v2.1 update over an existing v2.0.x install, the Console shows
CS0266errors such as:
(the same error may also mention KuwaharaVariant or XDoGThresholdMode)
```Assets\CelShaderFX\Editor\CelShaderDefaultPresetGenerator.cs(...): error CS0266:Cannot implicitly convert type 'CelShaderFX.CelShaderSettings.DitheringMode'to 'CelShaderFX.DitheringSettings.DitheringMode'. An explicit conversion exists(are you missing a cast?)```Cause:
CelShaderDefaultPresetGenerator.cs is an internal preset-authoring tool that shipped in v2.0.x but was removed from the v2.1 package. Unity’s importer never deletes files that are absent from an update, so the old copy stays in your project. v2.1 reorganized the effect settings into per-module groups, and the leftover v2.0.x tool references the old type locations - producing these errors. This does not affect the shader or your scenes; it is only the orphaned editor tool that fails to compile.
Solution:
- In the Project window, open
Assets/CelShaderFX/Editor/ - Delete
CelShaderDefaultPresetGenerator.cs(Unity removes its.metaautomatically) - Let Unity recompile - the errors clear
This is an internal tool only; removing it has no effect on the effect, your presets, or anything at runtime.
Will I lose the ability to use presets? No. The ready-made presets ship as pre-built assets in
CelShaderFX/Resources/DefaultPresets/(browse them via Tools > CelShaderFX > Open Preset Browser) and remain in your project. Deleting the generator only removes the authoring tool, not the presets. If you ever delete or lose the preset assets themselves, restore them by reimporting CelShaderFX from the Package Manager (My Assets) - that brings back the full set; the generator is not needed for recovery.
Thorough alternative: to clear any other leftovers from the old version in one pass, back up any custom presets, delete the entire Assets/CelShaderFX folder, and reimport v2.1 from the Package Manager.
Effect Not Visible
Section titled “Effect Not Visible”Effect not showing at all
Section titled “Effect not showing at all”Checklist:
- Component/Volume added to camera or scene?
- Settings asset assigned?
- At least one effect enabled?
- Effect intensity > 0?
- Correct render pipeline setup?
Built-In Pipeline
Section titled “Built-In Pipeline”Issue: No effect visible with CelPostProcessEffect
Solutions:
- Check camera - Component must be on the active camera
- Check settings - Ensure a CelShaderSettings asset is assigned
- Check enable flags - At least one effect must be enabled:
settings.enableCelShading = true;// orsettings.enableOutline = true;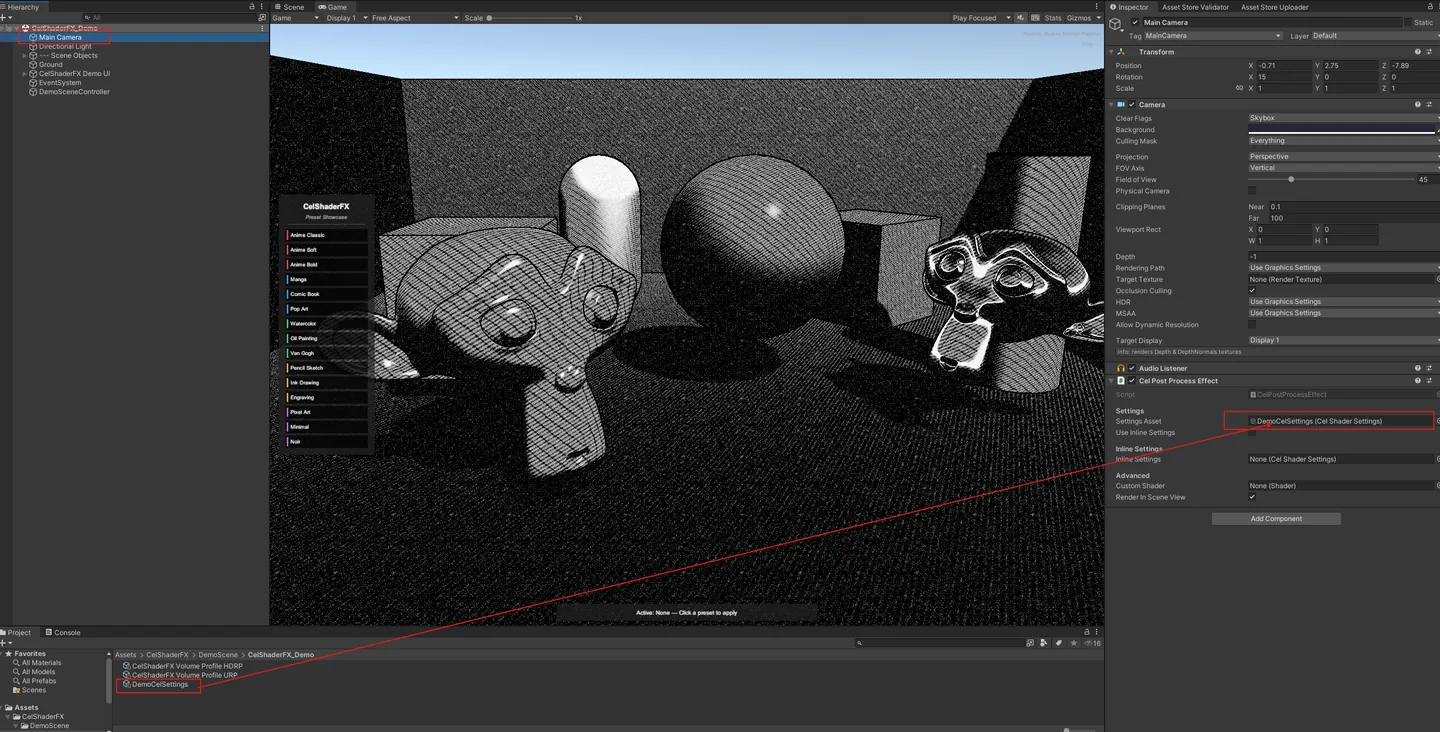
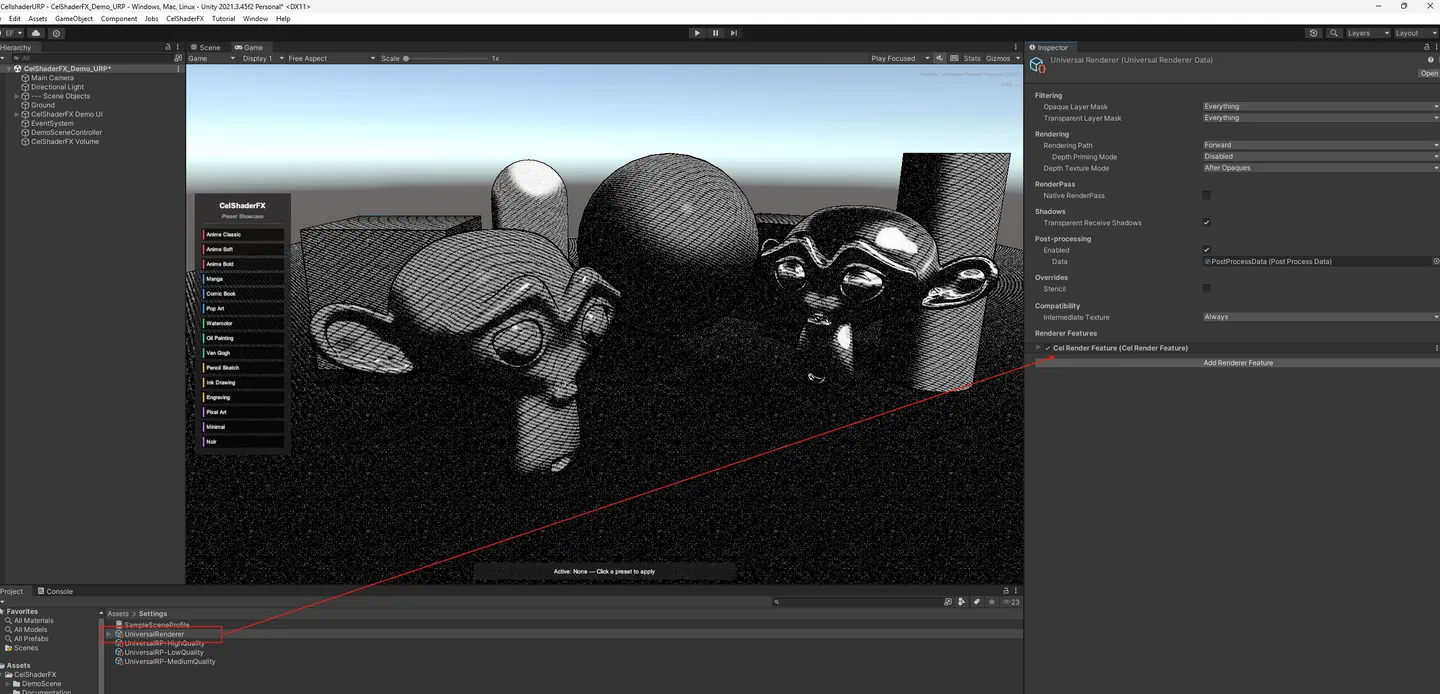
Issue: No effect visible in URP
Solutions:
- Add Renderer Feature:
-
- Select your URP Renderer Asset
- Click “Add Renderer Feature”
- Add “Cel Render Feature”
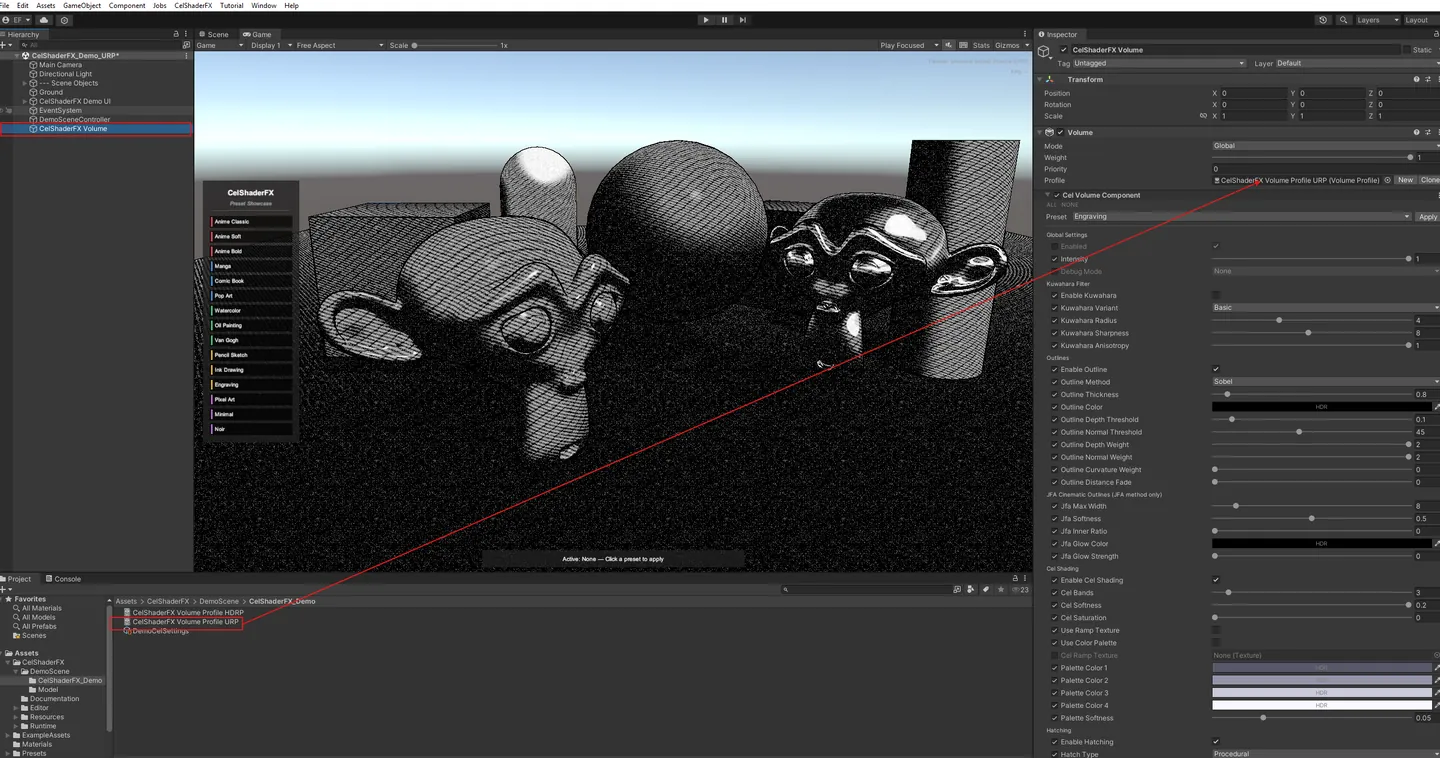
- Create Volume:
-
- Create GameObject with Volume component
- Set Mode to “Global”
- Add CelVolumeComponent override
- Enable overrides:
-
- Check the box next to each parameter group
- Enable specific effects
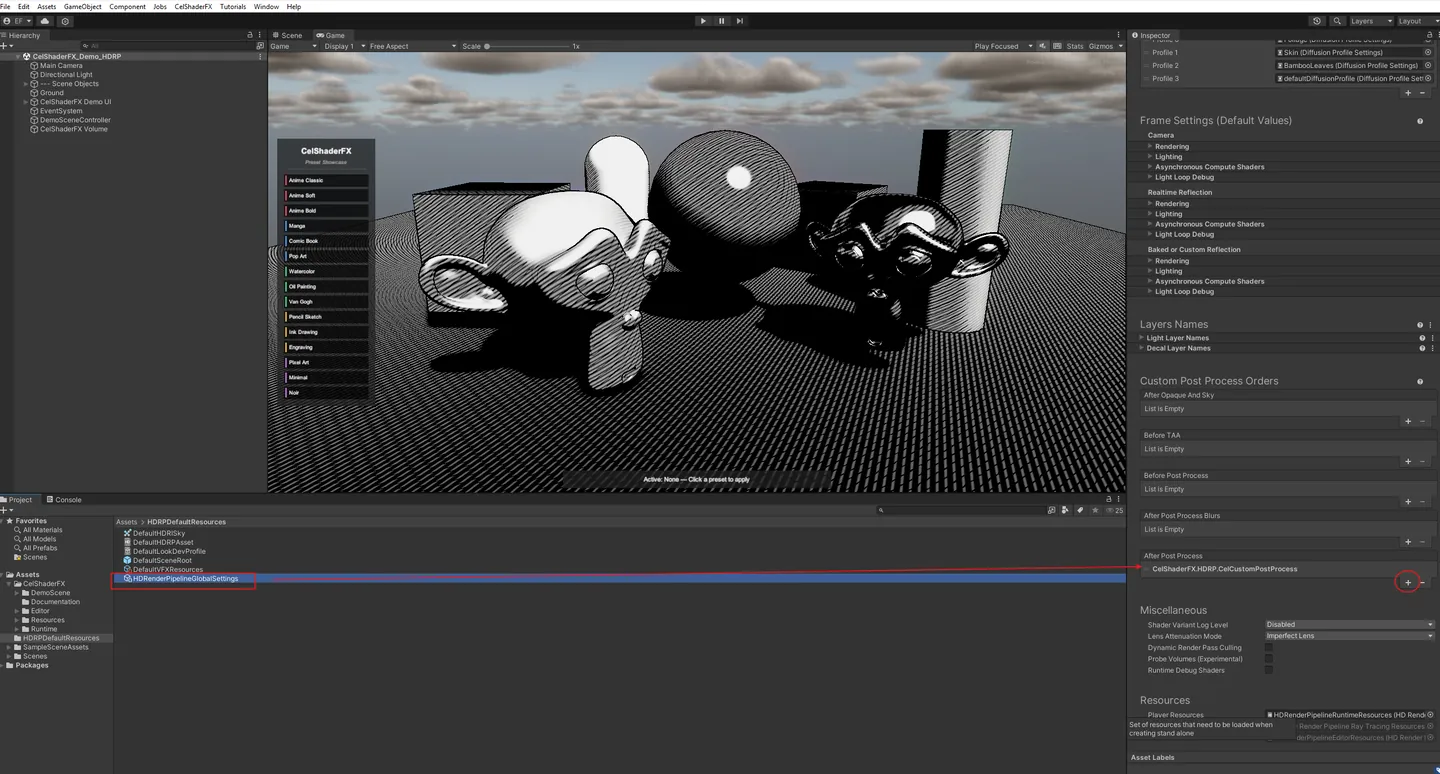
Issue: No effect visible in HDRP
Solutions:
- Register post-process:
-
- Edit > Project Settings > HDRP Default Settings
- Custom Post Process Orders > After Post Process
- Add “CelCustomPostProcess”
- Create Volume:
-
- Same as URP setup
Effect only partial
Section titled “Effect only partial”Issue: Some effects work, others don’t
Solutions:
- Check individual enable flags - Each effect has its own toggle
- Check intensity values - 0 intensity = invisible
- Check shader keywords - Some effects require specific shader variants
Visual Artifacts
Section titled “Visual Artifacts”Hatching “swimming” / jittering
Section titled “Hatching “swimming” / jittering”Symptoms:
- Hatching lines move when camera moves
- Lines don’t stick to surfaces
Solutions:
- Increase World Space Weight:
World Space Weight: 0.7View Space Weight: 0.2Screen Space Weight: 0.1- Enable Temporal Stability:
-
- Increase Temporal Stability parameter (0.8-1.0)
- Use Blended Mode:
-
- Set Hatching Mode to “Blended”
Outline flickering
Section titled “Outline flickering”Symptoms:
- Outlines appear and disappear
- Inconsistent edge detection
Solutions:
- Adjust thresholds:
-
- Lower Depth Threshold for more consistent depth edges
- Adjust Normal Threshold for surface angle sensitivity
- Check depth buffer:
-
- Ensure camera has depth texture enabled
- In URP: Check “Depth Texture” in URP Asset
- Distance fade:
-
- If flickering at distance, increase Distance Fade
Banding / color steps visible
Section titled “Banding / color steps visible”Symptoms:
- Harsh visible steps between cel shading bands
- Not smooth enough transitions
Solutions:
- Increase softness:
Cel Softness: 0.1 - 0.2 (instead of 0.05)- Increase band count:
Band Count: 6-8 (instead of 3-4)- Add dithering:
-
- Enable subtle dithering to break up bands
Z-fighting / depth issues
Section titled “Z-fighting / depth issues”Symptoms:
- Outlines on wrong objects
- Effects applied incorrectly
Solutions:
- Check near/far planes:
-
- Camera near plane not too small (> 0.1)
- Far plane not too large
- Adjust depth threshold:
-
- Increase Depth Threshold if too many false edges
Performance Issues
Section titled “Performance Issues”Low framerate
Section titled “Low framerate”Symptoms:
- FPS drops significantly with effects enabled
- GPU usage very high
Solutions:
- Reduce Kuwahara radius:
Radius: 2-3 (instead of 5+)| Radius | Relative Cost |
|---|---|
| 2 | 1x |
| 4 | 4x |
| 6 | 9x |
- Use Basic Kuwahara variant:
-
- Basic is fastest
- Anisotropic is slowest
- Reduce hatching layers:
Layers: 2 (instead of 4)- Disable unused effects:
-
- Toggle off any effect you’re not using
- Use quality presets:
-
- Mobile/Low preset for weaker hardware
Mobile performance
Section titled “Mobile performance”Solutions:
- Disable Kuwahara - Too expensive for most mobile
- Use simpler outline method - Sobel is fastest
- Reduce texture sizes - Use smaller TAM textures
- Lower resolution - Consider render scale < 1.0
Shader compilation stutters
Section titled “Shader compilation stutters”Symptoms:
- Freezes when effects are first enabled
- Hitches during gameplay
Solutions:
- Warm up shaders:
// In loading screenShader.WarmupAllShaders();- Use shader preloading:
-
- Add shaders to Graphics Settings > Preloaded Shaders
Pipeline-Specific Issues
Section titled “Pipeline-Specific Issues”URP: Depth texture not available
Section titled “URP: Depth texture not available”Symptoms:
- Outlines don’t work
- Depth-based effects fail
Solutions:
- Enable depth texture:
-
- Select URP Asset
- Check “Depth Texture” option
URP: Effect renders twice
Section titled “URP: Effect renders twice”Symptoms:
- Double effect intensity
- Performance worse than expected
Solutions:
- Check for duplicate Volumes
- Check Renderer Feature isn’t added twice
- Ensure only one CelRenderFeature exists
HDRP: Effect not in correct order
Section titled “HDRP: Effect not in correct order”Symptoms:
- Effect appears before/after other post-effects unexpectedly
Solutions:
- Adjust injection point:
-
- HDRP Settings > Custom Post Process Orders
- Move CelCustomPostProcess to desired position
Different appearance across pipelines
Section titled “Different appearance across pipelines”Symptoms:
- Effect looks different in URP vs Built-In
Solutions:
- Check color space:
-
- All pipelines should use same color space (Linear recommended)
- Check Volume settings:
-
- URP/HDRP use Volumes - ensure settings match
- HDR differences:
-
- HDRP uses HDR - values may need adjustment
Shader Errors
Section titled “Shader Errors”“Shader not found”
Section titled ““Shader not found””Error:
CelModularController: Could not find cel shader!Solutions:
- Check shader path:
-
- Ensure shaders exist in CelShaderFX/Runtime/Shaders/
- Reimport shaders:
-
- Right-click shader folder > Reimport
- Check for correct pipeline:
-
- Built-In uses different shader than URP/HDRP
Shader compilation errors
Section titled “Shader compilation errors”Error:
Shader error in 'Hidden/CelShaderFX/...': ...Solutions:
- Check Unity version - Some features require newer Unity
- Check render pipeline version - Ensure compatible URP/HDRP version
- Check include paths - Shader includes must be correct
Pink/magenta materials
Section titled “Pink/magenta materials”Symptoms:
- Screen turns pink
- Objects render pink
Solutions:
- Shader not compiled:
-
- Reimport shaders
- Check for compilation errors in Console
- Wrong pipeline:
-
- Ensure correct shader variant for your pipeline
Editor Issues
Section titled “Editor Issues”Inspector not updating
Section titled “Inspector not updating”Symptoms:
- Changes in Inspector don’t reflect in Scene view
- Need to toggle effect off/on
Solutions:
- Force refresh:
// Call this after changing settingseffect.RefreshMaterial();- Check auto-apply:
-
- CelModularController: Ensure Auto Apply Changes is enabled
Preview window not working
Section titled “Preview window not working”Symptoms:
- Preview Window shows black/nothing
- Can’t see effect preview
Solutions:
- Check camera:
-
- Preview needs an active camera in scene
- Check effect setup:
-
- Effect must be properly configured first
Preset browser empty
Section titled “Preset browser empty”Symptoms:
- No presets showing in Preset Browser
Solutions:
- Check Resources folder:
-
- Presets should be in CelShaderFX/Resources/DefaultPresets/
- Reimport presets:
-
- Right-click DefaultPresets folder > Reimport
Q: Can I use multiple CelShaderFX components?
Section titled “Q: Can I use multiple CelShaderFX components?”A: Generally no. Use one controller per camera. For different effects on different objects, use the Object Exclusion system.
Q: Does CelShaderFX work with VR?
Section titled “Q: Does CelShaderFX work with VR?”A: Yes, but:
- Use Single Pass Instanced rendering for best performance
- Test Kuwahara radius carefully - VR requires high framerates
- Some effects may need per-eye adjustment
Q: Can I use CelShaderFX with other post-processing?
Section titled “Q: Can I use CelShaderFX with other post-processing?”A: Yes. CelShaderFX works alongside:
- Unity Post Processing Stack v2
- URP Post Processing
- HDRP Post Processing
- Third-party effects
Order in the stack matters - adjust to get desired look.
Q: Why are my custom TAM textures not working?
Section titled “Q: Why are my custom TAM textures not working?”A: Check:
- Texture is horizontal strip (tones left to right)
- Tone Count matches number of tones in texture
- Invert Texture is set correctly (white lines = OFF, black lines = ON)
- Texture import settings: No compression, Read/Write enabled
Q: How do I exclude UI from effects?
Section titled “Q: How do I exclude UI from effects?”A: Options:
- Use Screen Space - Overlay canvas (renders after post-process)
- Use Object Exclusion layer
- Render UI to separate camera
Q: Can I animate effect parameters?
Section titled “Q: Can I animate effect parameters?”A: Yes!
// In Update or Coroutinesettings.outlineThickness = Mathf.Sin(Time.time) * 2f + 1f;
// Or use Animation component// Create animation clip targeting settings fields
Q: Effect looks different in build vs editor
Section titled “Q: Effect looks different in build vs editor”A: Check:
- Quality settings match
- Shader stripping settings (don’t strip CelShaderFX keywords)
- Build target specific issues (mobile vs desktop)
Still Having Issues?
Section titled “Still Having Issues?”If you’ve tried the solutions above and still have problems:
- Check Console - Look for error messages
- Verify setup - Re-follow Quick Start Guide
- Test in new project - Rule out project-specific issues
- Check Unity version - Ensure compatible version
Getting Help
Section titled “Getting Help”- Documentation: Review User Manual
- Support: Contact via Asset Store
- Updates: Check for newer versions
Back to User Manual | Quick Start
Opens our feedback form in a new tab with the tool name pre-filled.