
No. 1227 LB LabsEQLabs Pro
Painting Lab
Type: Custom Asset Editor (Pattern B) · Asset class:
UPaintingLabAsset· Category: Labs
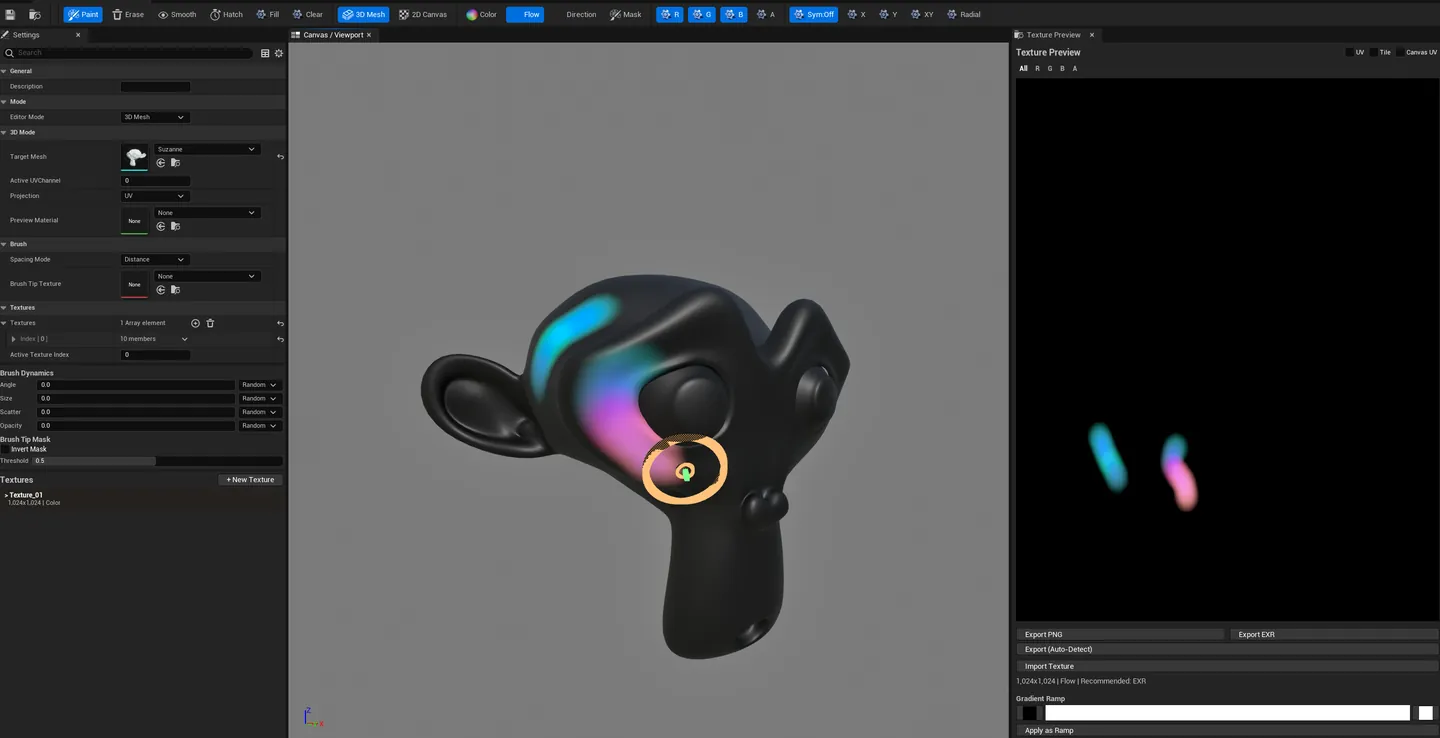
A full in-editor texture painting workspace. Paint directly on a static mesh through its UV layout
or a triplanar projection, or switch to a flat 2D canvas for VFX sprites and standalone textures.
Five paint modes cover the texture types you actually ship — RGBA Color, direction-encoded Flow,
tangent-space Direction, per-channel Mask, and stroke-driven Normal. The asset is a real .uasset
holding every texture in the session, and Flipbook Studio turns the same canvas into a frame
timeline with onion skin, a playback preview and one-click sprite-sheet atlas export.
Export writes a UTexture2D and an image file on disk in one action, with seam dilation applied
automatically. No round-trip to Substance Painter for flowmaps, damage masks, hand-painted VFX
sprites, or flipbooks.
When to use it
Section titled “When to use it”- Authoring flowmaps for water / cloth / lava materials: Flow mode encodes brush direction directly into RG channels
- Painting damage and wear masks that hook into a layered material (rust, wetness, edge wear, dirt) — four user-labeled channels per RGBA texture
- Hand-painted VFX sprites (alpha shapes, erosion masks, splatter decals) on the 2D canvas, with tiling preview to evaluate seamlessness
- Animated VFX flipbooks. Paint frame by frame with onion skin, preview at your target FPS, and. export a power-of-two atlas plus a ready Niagara SubUV material
- Painting anisotropic direction maps (hair, brushed metal) using Direction mode, which encodes the brush comb into the surface tangent space
- Ink and hatch work. The Hatch tool draws parallel line fills; overlap strokes at different. angles to cross-hatch
- Quick texture polish on top of an imported source: drop an existing texture in as the canvas starting point and paint corrections
What it isn’t for
Section titled “What it isn’t for”- Don’t expect a Substance Painter replacement for full PBR layer authoring. Painting Lab is. per-texture, not per-material-stack. There is no non-destructive layer system; strokes composite into the pixel buffer as you paint.
- Don’t paint on meshes with overlapping UVs without symmetry off. Mirrored UVs paint both. regions simultaneously. Use UV channel 1+ for a non-overlapping set.
- Don’t use this for terrain texture painting. UE’s Landscape painting is a different problem;. Painting Lab targets per-asset textures, not landscape weight maps.
- Triplanar fallback is for preview only on UV-less meshes. The painted result is world-space. projected and won’t be portable to UV-based tools.
Creating the asset
Section titled “Creating the asset”There are two equivalent paths:
From the Content Browser:
- Right-click in the Content Browser.
- Pick EQLabs → Painting Lab Asset.
- Name the asset; double-click to open.
From the EQLabs Hub:
- Open Window → EQLabs Hub.
- Search for
Paintingor browse to Art → Paint. - Click the Painting Lab tile.
The asset is a UPaintingLabAsset .uasset. It survives across sessions, holds every texture
you’ve painted, and serializes with a magic number + version tag so future format changes load
cleanly.
Editor layout
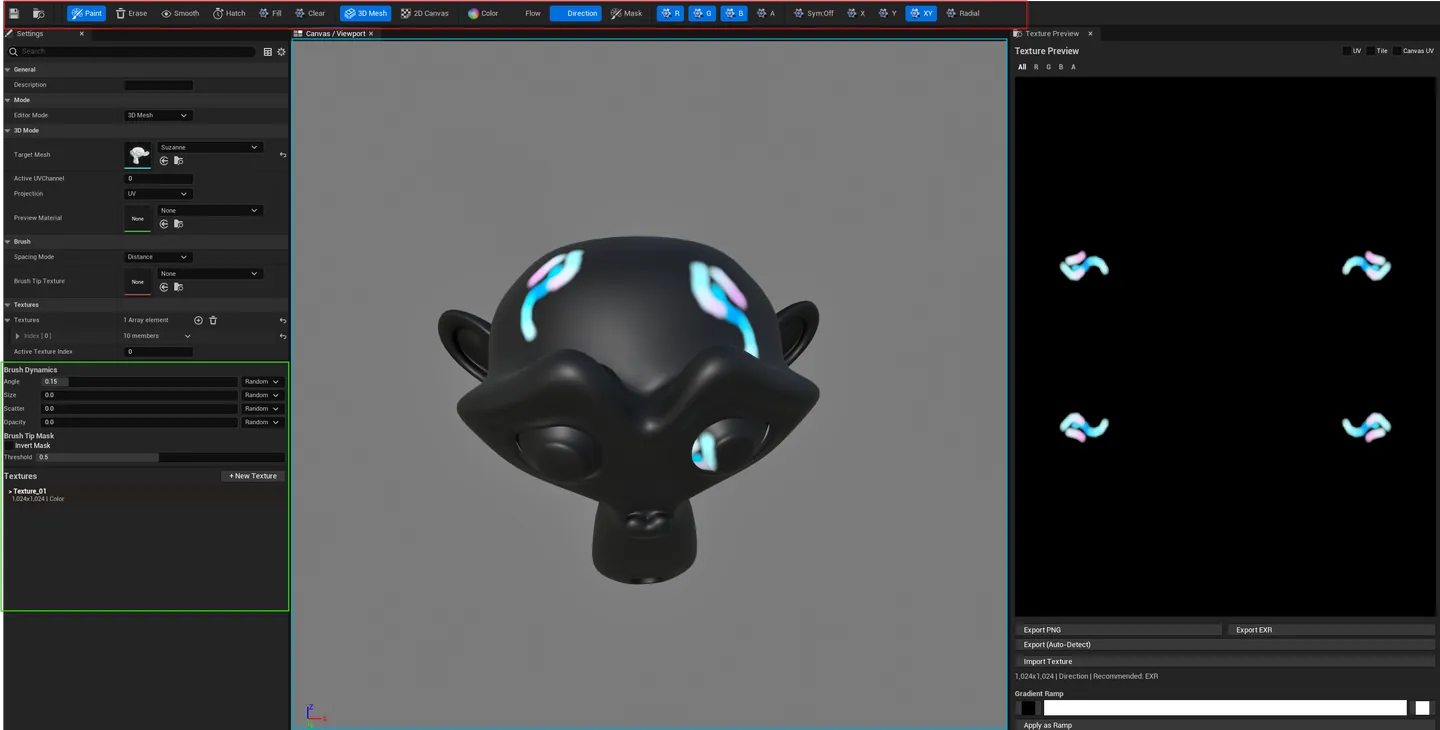
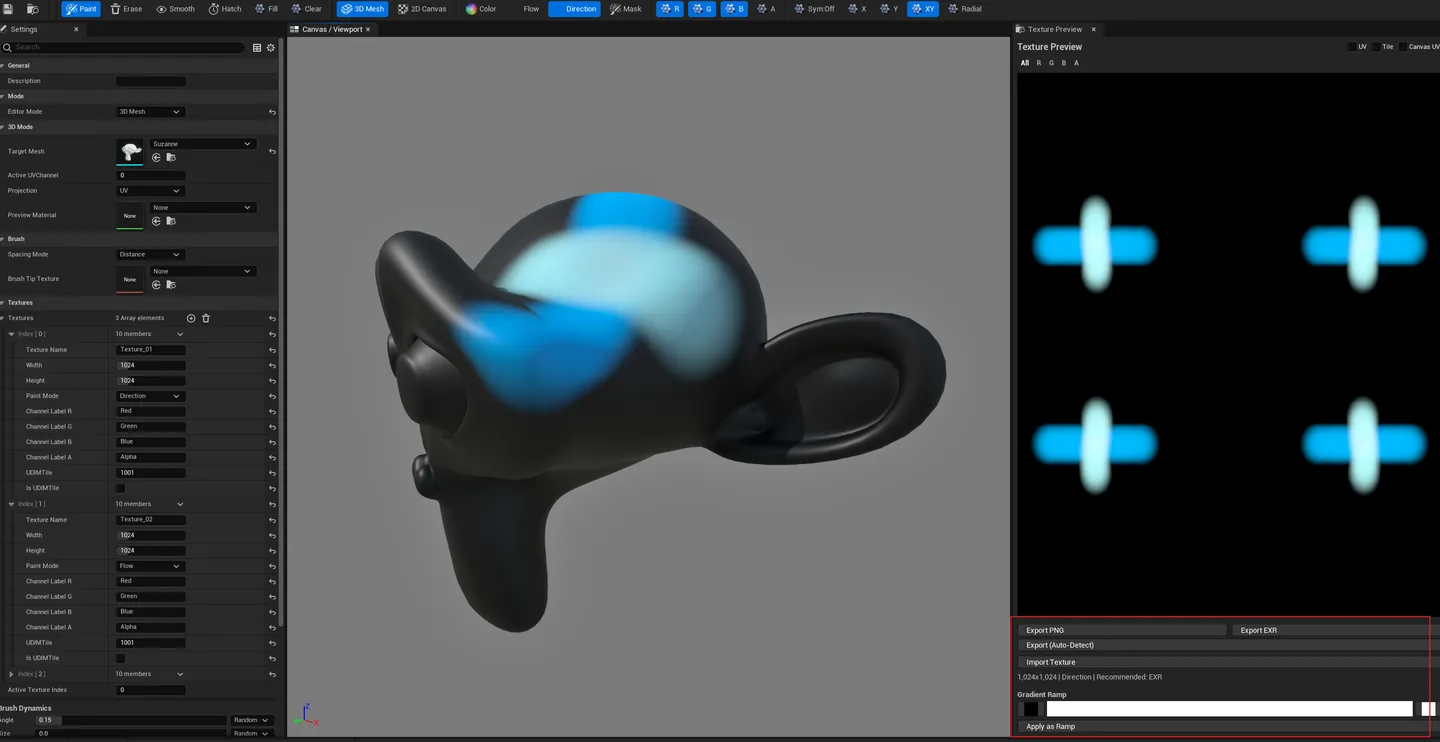
Section titled “Editor layout”Three dockable tabs: Settings (left), Canvas / Viewport (centre), Texture Preview (right). A fourth tab, Flipbook (Animation), carries the frame timeline.
Toolbar (top)
Section titled “Toolbar (top)”| Control | What it does |
|---|---|
| 3D Mesh / 2D Canvas toggle | Swaps between mesh-projected painting and flat-canvas painting |
| Tool selector | Paint / Erase / Smooth / Hatch / Fill / Clear |
| Paint mode | Color / Flow / Direction / Mask (Normal is set per-texture — see below) |
| Channel toggles | R / G / B / A — which channels a stroke is allowed to write |
| Symmetry | Sym:Off / X / Y / XY (4-way) / Radial (N segments) |
Clear resets the active texture to its neutral value for its paint mode, not to black — see the paint-mode table.
Settings panel (left)
Section titled “Settings panel (left)”A details view bound to the asset. Structural choices live here rather than on the toolbar: Mode, Target Mesh, Active UV Channel (0–7), Projection (UV or Triplanar), Preview Material, Brush Tip Texture, the Textures array (name, resolution, paint mode, four channel labels), and the Palette.
Viewport (center)
Section titled “Viewport (center)”In 3D Mesh mode it’s an SEditorViewport with the assigned mesh. The brush cursor tracks the
mesh surface in UV space; what you paint shows up live on the mesh. Triplanar projection is
available for meshes without usable UVs.
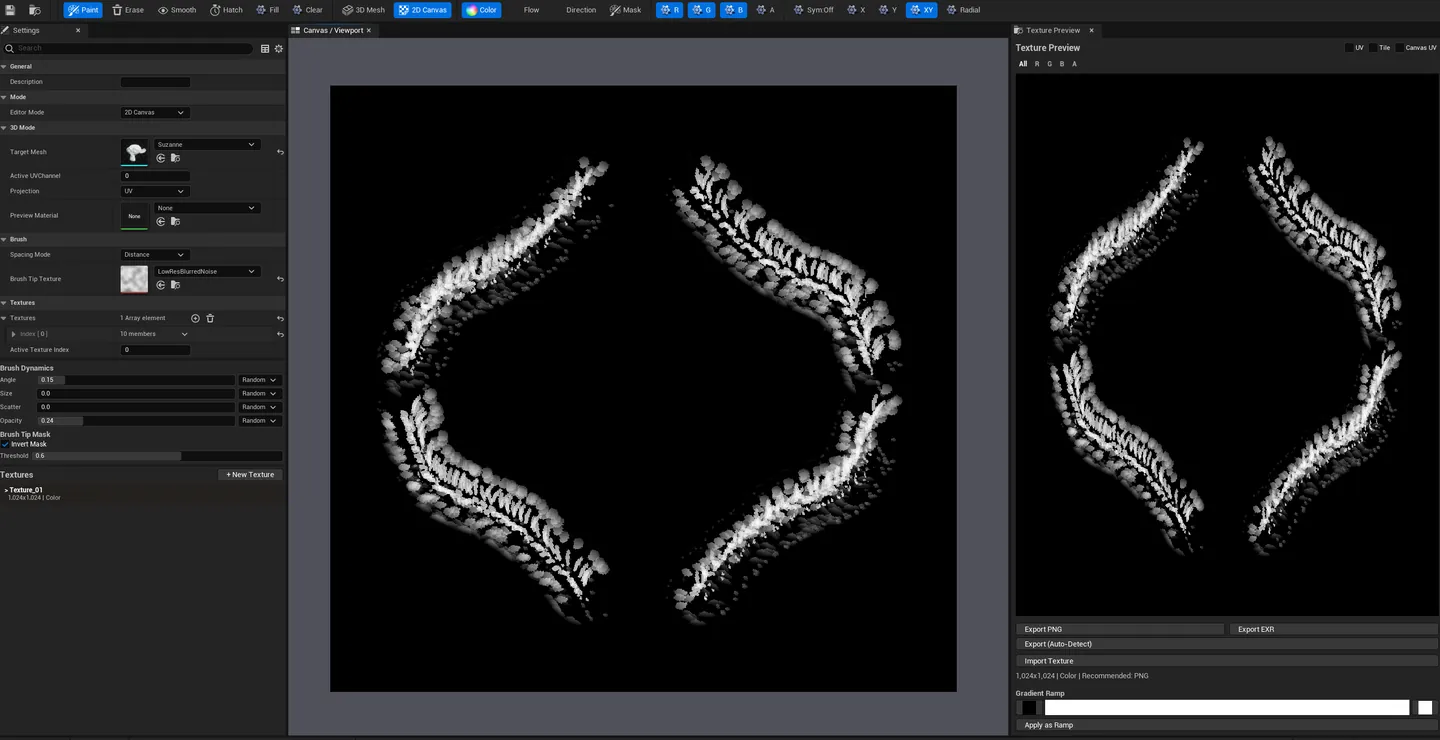
In 2D Canvas mode it’s a flat SPaintingLabCanvas widget with pan/zoom. Optional Tile
preview wraps the canvas as a 3×3 repeat to evaluate seam continuity.
A per-channel view selector (All / R / G / B / A) isolates one channel for inspection — critical when authoring channel-packed mask textures. A UV wireframe overlay draws the mesh’s UV islands on top of the texture preview.
Input map
Section titled “Input map”| Gesture | 3D viewport | 2D canvas |
|---|---|---|
| LMB drag | Paint | Paint |
| Shift + LMB | Line stroke — press at the start, release at the end; the run commits as evenly spaced dabs | — |
| Ctrl + LMB | Eyedropper — picks the painted colour under the cursor into the brush | Eyedropper |
| Alt + LMB | Orbit the camera | — |
| RMB drag | — | Pan |
| Scroll | — | Zoom |
| Shift + Scroll | — | Brush size |
Brush Settings panel
Section titled “Brush Settings panel”| Field | What it does | Default |
|---|---|---|
| Size | Brush radius — UV-space units in 3D mode, canvas pixels in 2D | 5.0 |
| Strength | Per-stamp opacity / influence, 0–1 | 0.5 |
| Falloff | Edge softness, 0 (hard) → 1 (fully feathered) | 0.8 |
| Spacing | Gap between brush stamps | 5.0 |
| Spacing Mode | Distance (Photoshop-style) or Time | Distance |
| Color | Brush paint colour (Color mode). The alpha channel paints the A channel. | White |
Brush Presets
Section titled “Brush Presets”Save… writes the current brush settings to a reusable Brush Preset asset; Load… applies one back. Presets carry the whole brush state, so a hatching setup or a soft-airbrush setup is one click away in any Painting Lab asset.
Brush Dynamics
Section titled “Brush Dynamics”Four jitter channels — Angle, Size, Scatter and Opacity — each with an amount and a control source that decides what drives it:
| Control | Drives the jitter from |
|---|---|
| Off | Nothing — the parameter stays fixed |
| Random | A fresh random value per stamp |
| Stroke Direction | The direction the stroke is currently travelling |
| Fade | How far into the stroke this stamp is |
Brush Tip Mask
Section titled “Brush Tip Mask”An optional grayscale texture used as the stamp shape — brightness controls how strongly each pixel paints. Invert Mask flips it; Threshold sets the cutoff.
Stroke Stabilization
Section titled “Stroke Stabilization”Lazy Mouse runs cursor positions through a rolling-average filter before the raycast and the dab, so an unsteady hand still produces a clean curve. Smoothing is the window size — default 6, useful range 4–10. Larger is silkier but the brush lags further behind the cursor.
Paint modes
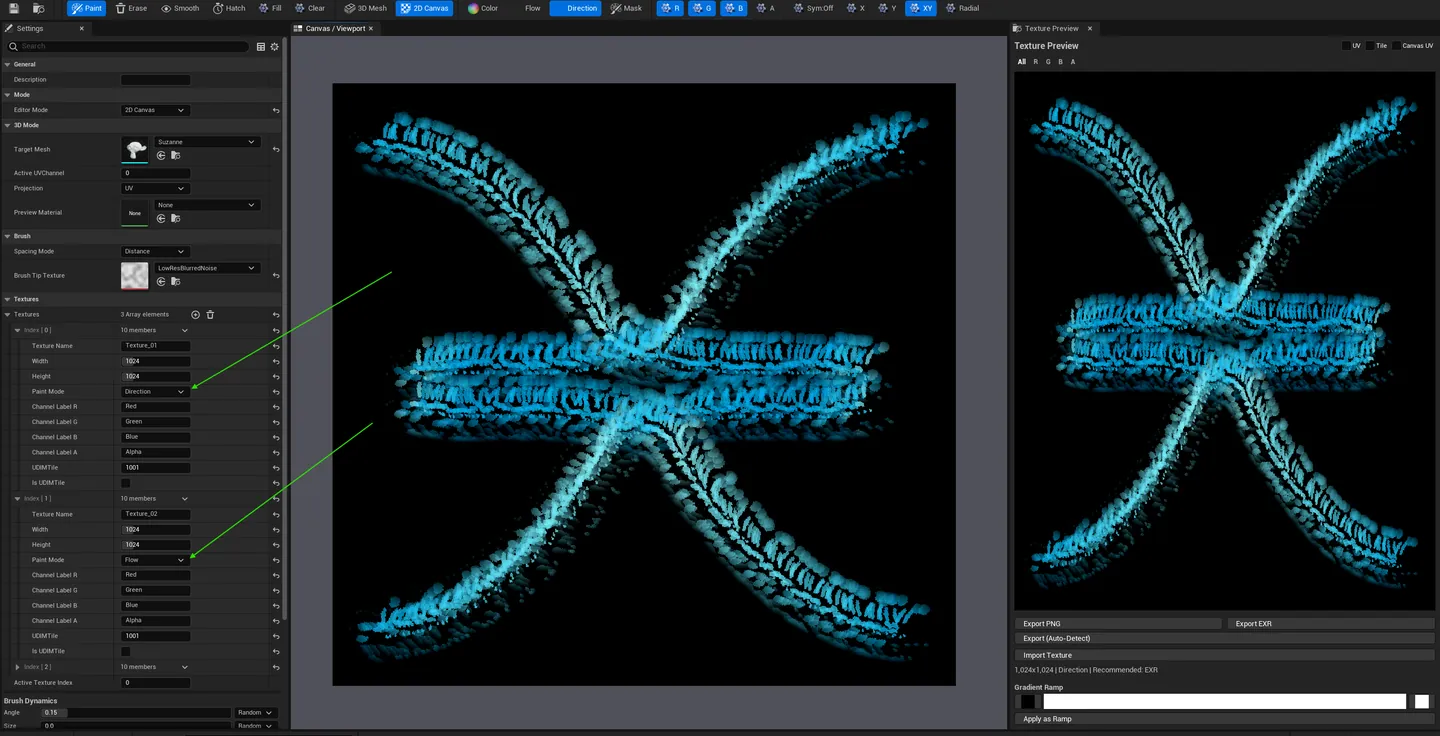
Section titled “Paint modes”The toolbar exposes four modes directly. A fifth, Normal, is set per-texture in the Settings
panel’s Paint Mode field, and is what the PBR Standard template assigns to its Normal slot.
| Mode | What a stroke writes | Neutral (unpainted) value |
|---|---|---|
| Color | RGBA directly | Black |
| Flow | The stroke’s direction as a 2D vector in RG, intensity in B | (0.5, 0.5, 0, 1) — zero direction |
| Direction | The stroke direction as a normalised tangent in RG, a painted flag in B | (0.5, 0.5, 0, 1) |
| Mask | Per-channel grayscale, with your own channel labels | (0, 0, 0, 0) |
| Normal | A tangent-space normal pointing outward from the brush centre — an embossed bevel that follows the stroke | (0.5, 0.5, 1, 1) — flat |
Those neutral values are the single source of truth shared by texture creation, Clear, and the exporter’s seam-dilation gutter detection, so “unpainted” means the same thing everywhere.

Textures panel
Section titled “Textures panel”The asset holds any number of textures. Each row shows the name, resolution and paint mode; clicking switches the active painting target. + New Texture appends one; the X on a row removes it. Each texture has its own independent resolution (256–4096) and paint mode.
Starter templates
Section titled “Starter templates”From Template: two one-click sets that replace the whole texture list:
- PBR Standard. BaseColor (Color), Normal (Normal), Roughness (Mask), Metallic (Mask),. AO (Mask), all 1024×1024.
- VFX Pack. Mask4Pack (Mask), FlowMap (Flow), Direction (Direction).
Both wipe the existing textures and their painted pixels, and both confirm first when there is anything to lose.
Palette
Section titled “Palette”+ Save Color appends the current brush colour to a per-asset palette; clicking a swatch makes it the brush colour and Shift+click removes it. Clear empties the palette. Capped at 24 swatches — the oldest is evicted when full. The palette lives in the asset, so a project’s colour scheme travels with the file.
Gradient Ramp
Section titled “Gradient Ramp”Pick a left and a right colour, then Apply as Ramp fills the active texture with a horizontal gradient — a fast start for a ramp texture or a lookup strip.
Flipbook Studio
Section titled “Flipbook Studio”The Flipbook (Animation) tab turns the active texture into a frame sequence.
| Control | What it does |
|---|---|
| < Prev / Next > | Step through frames |
| + Dup | Add a frame after this one, copying its pixels as a starting point |
| + Blank | Add a new empty frame after this one |
| Delete | Delete the current frame (always keeps at least one) |
| < Move / Move > | Reorder the current frame one step earlier or later |
| Onion | Show neighbouring frames as faint ghosts — previous in red, next in green |
| Frames | How many ghost frames on each side (0–3) |
| Onion Opacity | Ghost visibility, 0.05 (faint) → 1.0 (solid) |
| Play / Stop | Play the sequence in the canvas |
| FPS | Playback rate |
Starter Presets set up a whole loop in one click: Fire 16 (16 frames @ 24 FPS), Smoke 16 (16 @ 16 FPS), Magic 12 (12 @ 12 FPS).
Flipbook export
Section titled “Flipbook export”- Export Atlas + Material. Tiles every frame into a power-of-two sprite-sheet atlas.
(
UTexture2D+ PNG) and creates a ready translucent flipbook material for Niagara SubUV or a material Flipbook node. - PNG Sequence. Every frame as a numbered 8-bit PNG in
Saved/PaintingLab. - EXR Sequence. Every frame as a numbered 16-bit float EXR in
Saved/PaintingLab.
Live 3D preview
Section titled “Live 3D preview”Without a Preview Material the tool uses its own built-in preview material and binds the active
painted texture to its Diffuse parameter.
Assign your own master material and the viewport additionally binds every painted texture to a
parameter named after that texture — a texture called BaseColor lands in the BaseColor
parameter, Roughness in Roughness, and so on. Parameters that don’t exist on the master are
skipped silently, so a partial match is fine: you see what the material can show, and nothing
errors.
Export
Section titled “Export”Three buttons — Export PNG, Export EXR, and Export (Auto-Detect) (PNG for Color and Mask, EXR for Flow and Direction).
Each export produces both:
- A
UTexture2Dasset in the same Content Browser folder as the Painting Lab asset. The Content Browser jumps to it when the export finishes. - An image file on disk under
<Project>/Saved/PaintingLab/— 8-bit PNG or 32-bit float EXR. The success toast carries a Show file link that opens the folder.
Colour data is sRGB-encoded for PNG; Mask, Flow, Direction and Normal stay linear.
Import Texture loads an existing UTexture2D into the active pixel buffer as a starting point.
Seam dilation is automatic
Section titled “Seam dilation is automatic”Every export runs four passes of alpha-aware seam dilation before writing. Painted colour bleeds outward across UV island borders into the unpainted gutter, so the black halos that otherwise appear at island edges once MIPs are generated do not happen. Dilation runs on a copy — the authoritative pixel buffer is untouched and you can keep painting.
Asset model: what’s stored
Section titled “Asset model: what’s stored”UPaintingLabAsset serializes through a custom Serialize() with a magic number and a version tag
(V1_Initial → V2_MultiTexture → V3_UDIMReady). The format is append-only: old assets load,
new fields default.
It holds the full texture list with paint mode, resolution, channel labels and the live pixel buffer per texture (and per frame, for flipbooks); the palette; the mesh and preview-material references; the UV channel; the projection mode; and the brush-tip reference. Reopen an asset weeks later and every texture, every channel label and every swatch is where you left it.
Settings reference
Section titled “Settings reference”| Setting | Default | Range / Type |
|---|---|---|
| Paint Mode | Color | Color / Flow / Direction / Mask / Normal |
| Brush Size | 5.0 | float |
| Brush Strength | 0.5 | 0 – 1 |
| Brush Falloff | 0.8 | 0 (hard) – 1 (soft) |
| Brush Spacing | 5.0 | float |
| Spacing Mode | Distance | Distance / Time |
| Symmetry | Off | Off / X / Y / XY / Radial |
| Radial Segments | 6 | int |
| Angle / Size / Scatter / Opacity Jitter | 0.0 | 0 – 1, each with a control source |
| Jitter Control | Random | Off / Random / Stroke Direction / Fade |
| Brush Tip Threshold | 0.5 | 0 – 1 |
| Lazy Mouse Smoothing | 6 | window size; useful range 4–10 |
| UV Channel | 0 | 0 – 7 |
| Projection | UV | UV / Triplanar |
| Texture Resolution | 1024 | 256 – 4096 |
| Palette | — | up to 24 swatches, oldest evicted |
Asset persistence: the painting session is stored inside the
.uassetitself — there is no separate JSON config or sidecar.
Tips and gotchas
Section titled “Tips and gotchas”- Undo depth is bounded by texture size. Each level holds a full copy of the pixel buffer, so. the stack caps at 20 steps, dropping to 5 on a 4096×4096 texture.
- A whole drag is one undo step. A single stroke with many stamps pushes one snapshot, not one. per stamp.
- Triplanar fallback is preview-only. It paints in world space rather than UV space, so the. result isn’t portable to other tools. Use only when the mesh has no usable UVs.
- Max canvas resolution is 4096×4096. For larger textures, paint as a sprite-sheet atlas or. tile across multiple textures in the same asset.
- Symmetry interacts with overlapping UVs. Meshes with mirrored UVs paint twice when symmetry. is off. Either turn symmetry on or move to a non-overlapping UV channel.
- Smooth is a box blur. For high-frequency detail recovery, use small brushes and multiple. passes; large blurs over fine detail are destructive.
- UDIM fields are scaffolding.
UDIMTileandbIsUDIMTileexist on each texture entry and the. format version is namedV3_UDIMReady, but multi-tile painting is not implemented. Leave the defaults alone.
Fixed in v2.0.3: changing Target Mesh used to stop the live preview
Section titled “Fixed in v2.0.3: changing Target Mesh used to stop the live preview”In releases up to and including v2.0.2, reassigning Target Mesh after the first assignment left the mesh rendering with its own material instead of the live paint preview. Painting still worked and the texture was still updated correctly — the strokes landed, the Texture Preview panel showed them, and export was unaffected — but they stopped appearing on the mesh.
If you are on v2.0.2 or earlier, the workaround is to close and reopen the Painting Lab asset after changing Target Mesh.
Found on 2026-08-29 by the standalone edition’s documentation screenshot rig and fixed the same
day, shipping in v2.0.3: SPaintingLabViewport::SetPreviewMesh now clears PaintPreviewMasterSource alongside the
cached MID, so the next UpdatePaintPreviewMulti rebuilds the instance and re-binds it to the new
component’s material slots. The Painting Lab EditorUI test asserts the preview survives both the
first and the second mesh assignment; with the fix reverted that assertion fails, which is how the
fix was verified rather than assumed.
Also available standalone
Section titled “Also available standalone”Painting Lab ships as its own Fab plugin as well. Since standalone 2.1.0 it is the same tool feature for feature — same painter, same five modes, same export, Flipbook Studio and Brush Presets included — and it opens from its own launcher rather than the Hub. See Painting Lab (standalone).
Full walkthrough
Section titled “Full walkthrough”Related tools
Section titled “Related tools”- Texture Paint Suite — splat map authoring with an Open in Painting Lab hand-off button
- Texture Channel Packer — pack Painting Lab EXR mask exports into combined ORM / channel-packed textures
- Smart Mask & Texture Processor — feed Painting Lab masks through procedural refinement
- Flipbook Maker — Niagara flipbook authoring around the atlases Flipbook Studio exports
- Material Texture Baker (Universal Bake Suite) — bake high-poly normal/AO/curvature first, then use Painting Lab to paint damage and color on the baked result
Opens our feedback form in a new tab with the tool name pre-filled.