
Vertex Color Painter
Vertex Color Painter
Section titled “Vertex Color Painter”Module: Modeling · Category: VertexColor · Tool ID:
VertexColorPainter
An interactive viewport brush for painting vertex colors directly onto static meshes in the level. Activates an editor mode that takes over your input — paint with the brush, scroll to resize, switch channels, undo, or hit Escape to exit.
When to use it
Section titled “When to use it”- Authoring per-vertex masks for material blending (dirt, moss, wear, snow accumulation)
- Driving wind/foliage shaders that read from vertex color channels
- Marking up specific vertices on a kit piece for a custom shader effect
- Quick tinting of a mesh without going back to your DCC
When not to use it
Section titled “When not to use it”- Don’t use this for inspection — use Vertex Color Viewer to audit existing vertex colors
- Don’t use this for whole-mesh fills — set a constant in the material or use the Universal Bake Suite’s vertex color bake mode
Opening the tool
Section titled “Opening the tool”- Open the EQLabs Hub and search for
Vertex Color Painter(or browse to Modeling → VertexColor) - Click the tool card to open its launcher panel
- Click Activate — this enables the painter EdMode in the level viewport
The Hub panel itself is the launcher. The actual painting controls appear in the viewport once the EdMode is active.
Interface tour
Section titled “Interface tour”Hub launcher panel
Section titled “Hub launcher panel”A minimal launcher with two buttons:
| Control | Behavior |
|---|---|
| Activate | Enables the painter EdMode. Disabled while already active. |
| Deactivate | Disables the EdMode. Disabled while already inactive. |
| Status indicator | Green ACTIVE — painting mode is running while engaged, gray Inactive otherwise. |
Viewport painter panel (appears when active)
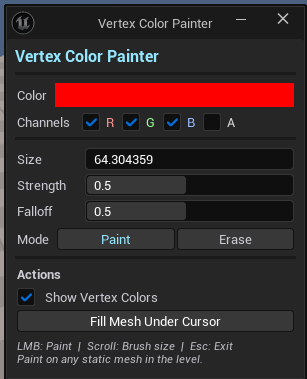
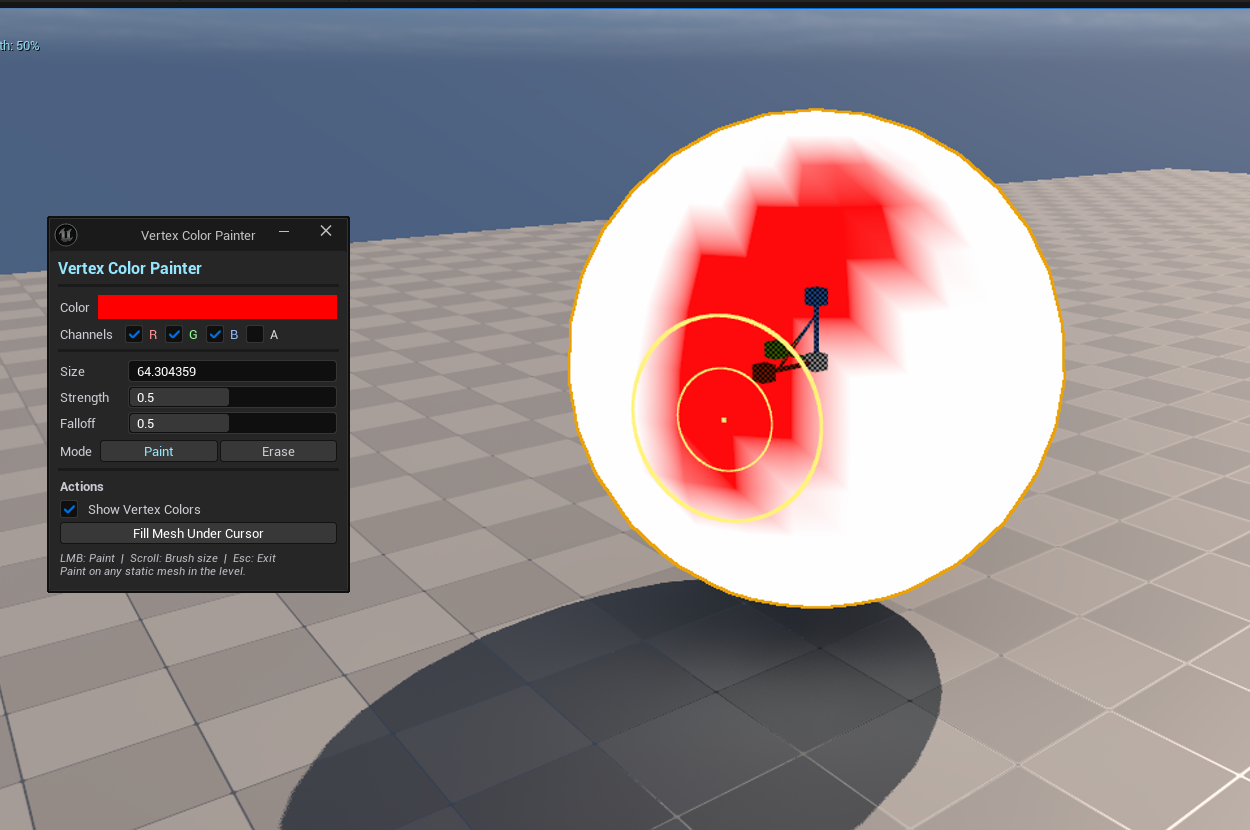
Section titled “Viewport painter panel (appears when active)”When the EdMode is active, a panel docks into the viewport with three collapsible sections:
- A swatch showing the current Paint Color — click it to open the color picker
- Strength — how much color is laid down per stroke (0–1)
- Falloff — soft-edge curve from brush center to rim (0 = hard edge, 1 = full feather)
- Channel mask — toggle R / G / B / A independently to paint only into selected channels
- Brush size — scroll wheel in the viewport to grow/shrink
Actions
Section titled “Actions”- Paint mode — apply Paint Color blended into the channels you’ve enabled
- Erase mode — clear vertex color back to default in the enabled channels
Workflow
Section titled “Workflow”Step 1 — Activate the painter
Section titled “Step 1 — Activate the painter”Open the Hub launcher and click Activate. The status flips to green, the viewport panel appears.
Step 2 — Set up the brush
Section titled “Step 2 — Set up the brush”Pick a paint color, dial in strength and falloff, and toggle the R/G/B/A channels you want to affect. Most material masks live in a single channel — turn the others off to avoid bleed.
Step 3 — Paint
Section titled “Step 3 — Paint”Hover the brush over a static mesh in the viewport. Left-click and drag to paint. Use the scroll wheel to resize the brush on the fly.
Step 4 — Switch to Erase if needed
Section titled “Step 4 — Switch to Erase if needed”Click Erase to clear vertex color from the selected channels. Same brush settings apply.
Step 5 — Exit
Section titled “Step 5 — Exit”Press Escape in the viewport, or click Deactivate in the Hub launcher. The mesh remains dirty until you Save All.
Settings reference
Section titled “Settings reference”| Field | What it does | Default |
|---|---|---|
| Paint Color | The color applied during paint strokes | Red |
| Brush Strength | Per-stroke deposit amount (0 = none, 1 = full) | 0.5 |
| Brush Falloff | Soft-edge curve | 0.5 |
| Brush Size | Brush radius (resize via mouse wheel in viewport) | — |
| Channel Mask | Which of R / G / B / A receive paint | All on |
| Blend Mode | Paint or Erase | Paint |
Output
Section titled “Output”- In-place modification — paint strokes write directly to the static mesh’s vertex colors. Mesh is marked dirty until Save All.
- Undo / redo — every stroke is a transaction.
Ctrl+Zwalks back stroke by stroke;Ctrl+Shift+Zredoes.
Tips & gotchas
Section titled “Tips & gotchas”- Scroll wheel resizes the brush — works while hovering over the viewport, no modifier key required.
- Escape exits the EdMode — fastest way out without going back to the Hub.
- Channel masking lets you stack masks in one mesh — author dirt in R, snow in G, moss in B without overwriting each other.
- Paint shows up immediately if your material samples vertex color — if you don’t see the change, the material isn’t reading vertex color or it’s reading a different channel.
- Save All afterward — paint persists in memory but isn’t written until you save the mesh asset.
Related tools
Section titled “Related tools”- Vertex Color Viewer — inspect/strip existing vertex colors (the read side)
- Universal Bake Suite (Art module) — bake high-poly data into vertex colors, also has a vertex color writer
- Layered Texture Paint Suite (Art module) — texture-based painting workflow when vertex resolution isn’t enough
Opens our feedback form in a new tab with the tool name pre-filled.